1 I have installed LED status lights for the PSX circuit breakers controlling the helix and middle level center.
2 I wired up all 24 occupancy detection coils for the helix.
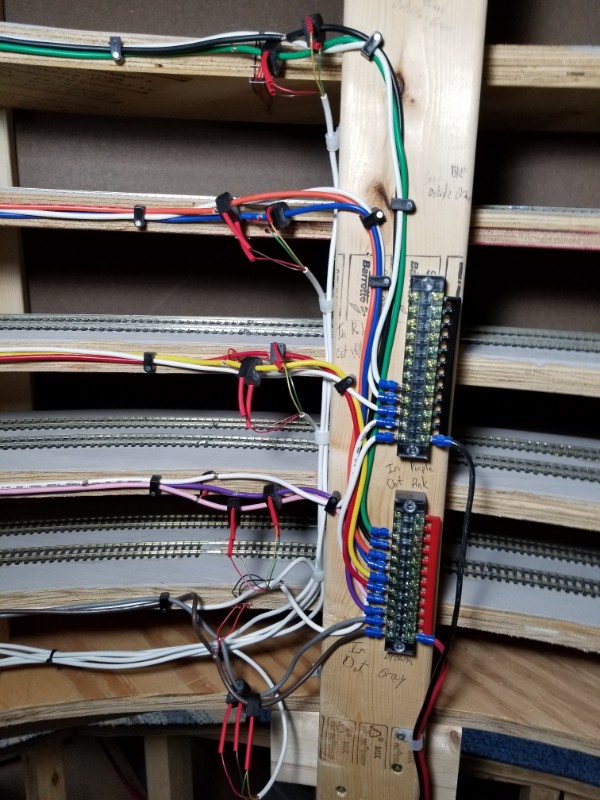
3 I wired up all 24 occupancy detection coils for the helix.
4 Gluing cork roadbed to transition from mainline to service siding.This siding will probably service a livestock facility.
5 Cork is glued and ready to start sanding/fairing.
6 Need to fair the cork roadbed down to the bare plywood.
7 This time I decided to use my Bosch hand planer. Much faster than hand sanding.
8 This time I decided to use my Bosch hand planer. Much faster than hand sanding.
9 Gluing down the code 70 Micro Engineering flex track.
10 Jan 5 2018 - I had a bit of an accident. :( I had some the buildings/structures I built for the previous layout on a bookshelf in the model workshop. The coal mine buildings were on the top shelf. There was a framed picture sitting on the shelf behind them. I bumped the book shelf and the picture fell forward knocking the Walthers coal mine kit 7ft down onto the floor. And then the picture/frame landed on the remains of the kit.
11 I moved the Digitrax UR-92 radio receiver up next to the upper level return loop control/status panel (in the center of the room).
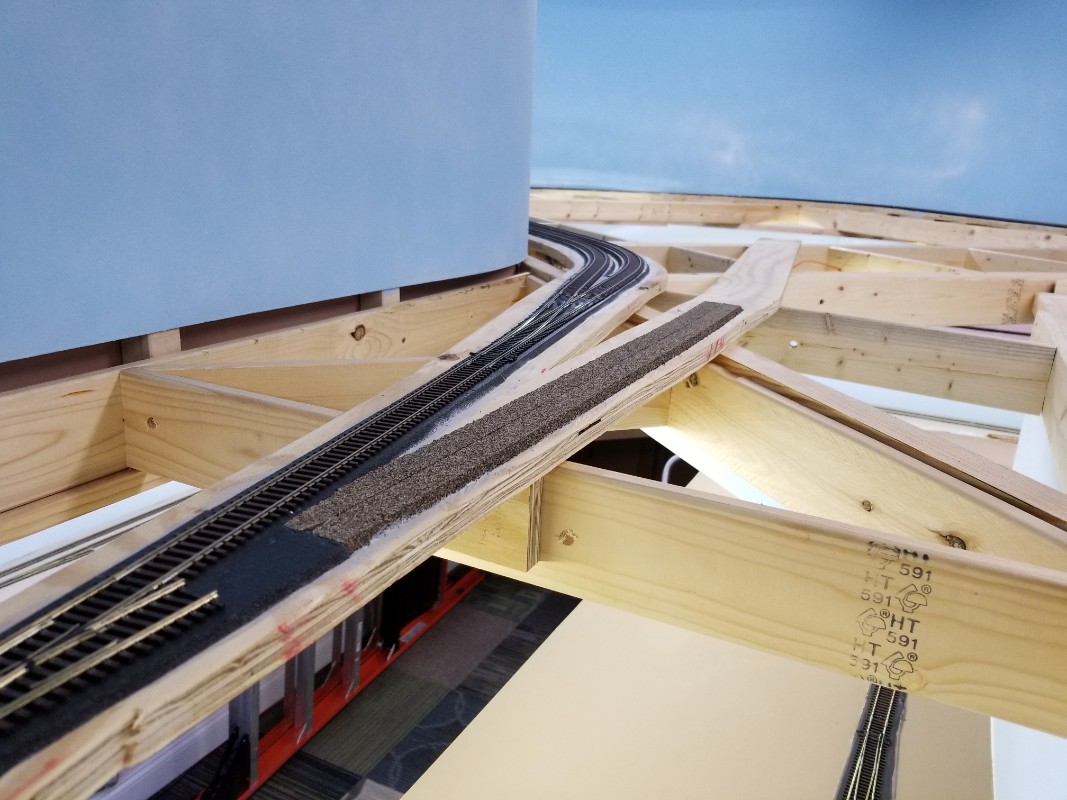
12 Noticeable kink in the track as it meets the #8 curved turnout. I need to redo this track....
13 The exits from the curved turnout are ok.
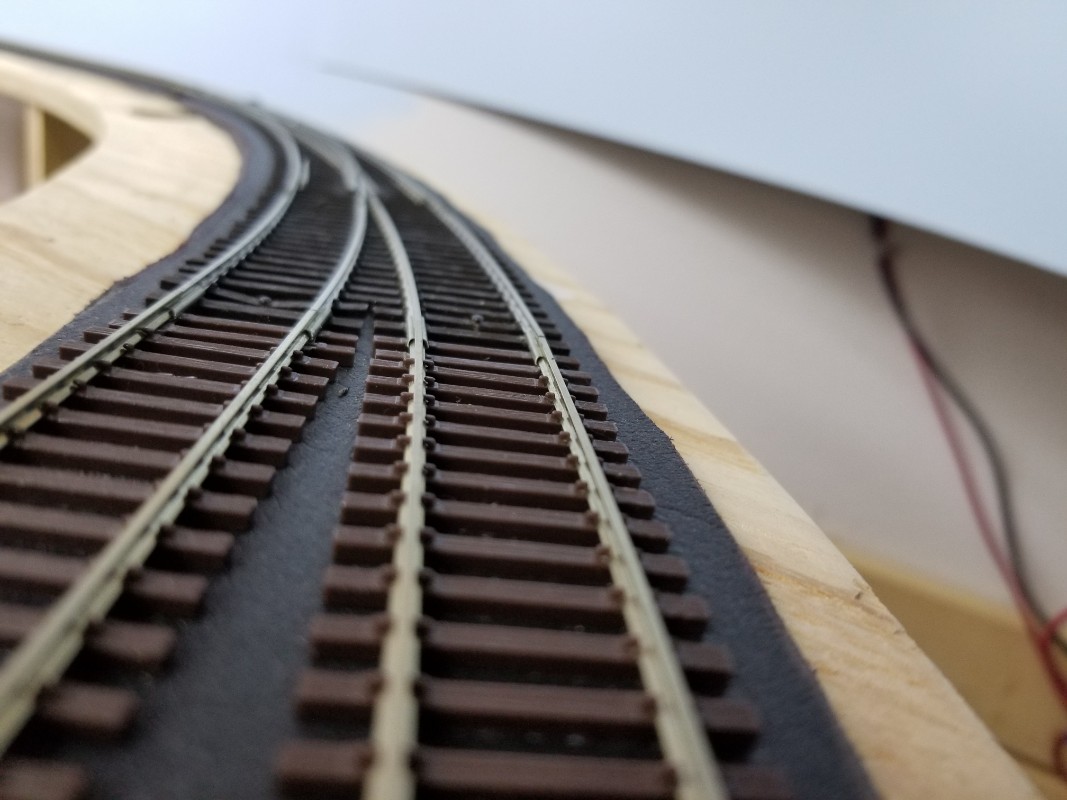
14 After redoing the track and soldering the flex track to the curved turnout. Much smoother.
15 Starting to work on the lower helper district service track sidings.
16 I had problems with the track as it passed through the backdrop and changed from code 83 to code 100 and had a double gap for occupancy detection. I redid the track so it's much more reliable.
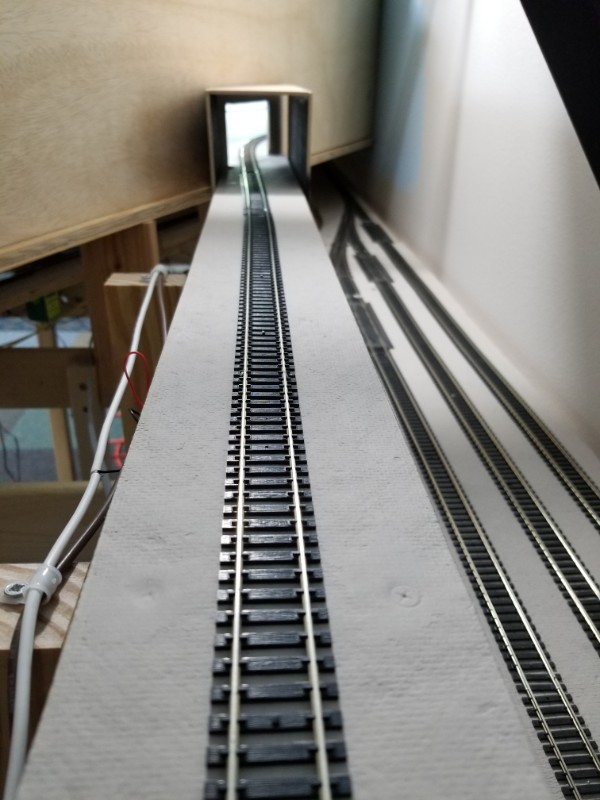
17 The new track
18 Headed the other way into the model workshop
19 The view of the lower return loop and 5 staging tracks.
20 I laid carpet tile under the helix.
21 I laid carpet tile under the helix.
22 I laid carpet tile under the helix.
23 I installed Tortoise motors and NCE Switch-It mk II boards with toggle switches to control the three turnouts for the four staging tracks in the model workshop.
24
25
26 The 'inside' of the helix status/control panel/door.
27 Three RR-Cirkit BOD-8 block occupancy detector boards and three FOB-A LED driver boards for the 24 occupancy zones in the helix.
28 Three RR-Cirkit BOD-8 block occupancy detector boards and three FOB-A LED driver boards for the 24 occupancy zones in the helix.
29 I installed (removable) 1/8" masonite panels over the two wndow openings and painted the blue backdrop along this wall (finally!)
30
31 I installed plywood subroadbed for the classification yard two lead tracks.
32 I installed plywood subroadbed for the classification yard two lead tracks.
33
34 All the backdrops have been painted basic sky blue. It's about 400 linear feet of backdrop.
35 I installed a status panel for three PSX circuit brakers for booster #1.
36 Jan 28 2018 - I decided I wanted a ice house/platform facility on a yard siding to provide ice for the reefer fleet. I wanted enough ice platform length to service 6 reefers and enough spur track length to handle 12 at a time. This required adding additional plywood roadbed adjacent to the two yard lead tracks.
37 Changing the track design at this late stage can cause some interesting benchwork work.
38 I finally got my order of 46 Peco turnouts required for the yard and loco service terminal (Along with 125 sections of flex track).
39 Gluing down one of the yard lead tracks.
40 Starting to work on the yard throat. It's fairly complicated because of the two arrival/departure tracks and two yard leads having the ability to simultaneously work two different sets of classification tracks without interfering with the other yard lead.
41 You can see the printed copy of the yard throat area I needed for reference purposes.
42 The Walthers "Car Shop" building will be located here and can be accessed from the yard "thoroughfare" track.
43 There are two caboose tracks, the track that allows yard lead track #2 to access the second set of classification tracks, and the main classification yard ladder track that connect the yard lead tracks to the thoroughfare track.
44 Yard leads and reefer ice service track are done.
45 Gluing down arrival/departure track #1 and dry placed arrival/departure track #2.
46 Gluing down arrival/departure track #1 and dry placed arrival/departure track #2.
47 Gluing down arrival/departure track #1 and dry placed arrival/departure track #2.
48 Feb 6 2018 - My technique for connecting track feeders. I bend the tip (~1/16") of the 22 ga solid wire and flatten it.
49 I place the flattened tip on the base of the rail.
50 After soldering. After the track is painted and ballasted the track feeder will be virtually invisible.
51 I have added a DCC Specialties "PowerPax" for the DCC programming track and a RRampMeter to show real-time DCC voltage and current to booster station #1.
52 Booster station #2 also has a RRampMeter and a 5V power supply for the two RR-Cirkits BOD-8 occupancy detection boards used in the lower return loop and staging tracks.
53 Booster station #3 has a 5V power supply for the five RR-Cirkits BOD-8 occupancy detection boards used by the helix and upper return loop/staging tracks. It needs a RRampMeter.
54 Booster station #4 provides power for the main classification yard and locomotive service terminal. It needs a RRampMeter.
55 Over the last month I have have systematically gone through all of my "era appropriate" locomotives to verify functionality, install DCC decoders as needed, configure long DCC addresses, lubricated as needed, test run, and added to JMRI DecoderPro 'Roster'. I have about 42 'era' plausible locomotives (as well as about 25 non era appropriate diesel locomotives (post 1959). In my world the Utah Railway will be running a couple 2-6-6-4 NW Class As and 4-6-4 Hudsons in addition to their 2-8-8-2 steamers.
56 Feb 10 2018 - I have started researching methods for weathering the track. The layout has about 1200 ft of visible track and 86 visible turnouts. Most of the videos show people using masking tape to cover the points and pivot points on turnouts to prevent them from getting sprayed in order to avoid electrical conductivity issues. After the spray paint dries they come back and manually touchup the masked areas with a paint brush. With 86 turnouts that would be tedious and I concluded that if I had a very precise mask object I could avoid the manual brush phase. So I created a couple mask objects using TinkerCad.com and my 3D printer.
57 The first attempt as slightly wide.
58 The second attempt fits perfectly.
59 Some people mask the pivot points but many people so it's not necessary.
60 I created a mask for the pivot points as well.
61 I modified the points mask to taper the areas that sit between the stock bars and the inside of the rails.
62 I noticed all three of my Athearn RTR Gas Turbine Veranda locomotives bounced severaly when crossing the #8 double slip switch and they caused frequent shorts on the frogs of the Peco insulfrog turnouts. I measured the width of the wheelsets and found all 14 axles on the locomotives/tenders were out of spec/narrow on all three locomotives/tenders. Internet research showed I wasn't the only person who noticed that problem. So I purchased an NSWL 'the puller' and adjusted the wheelsets/axles so they are within NMRA specification and now the locomotives/tenders run MUCH better.
63 There are four geared/driven axles and four non geared non driven axles on each gas turbine locomotive.
64
65 Working on gluing down the 8 classification tracks in the main yard. The eight tracks vary from 174" to 218" inches long and they can hold up to 250 40ft cars or 205 50ft cars.
66
67
68 Working on gluing the last track in the yard.
69 I need to replace all the missing ties where rails were joined.
70 The 'car shop' facility in the foreground.
71 All the 'missing' ties have been placed.
72 All the 'missing' ties have been placed.
73
74 Starting to do some testing on weathering/painting track.
75 They seem to work great. The points mask works for both the Peco #6 and #8 turnouts, but the pivot mask geometry is different between the #6 and #8 turnouts.
76 After removing the masks.
77 It's time to start making decisions on ballast color. Here's some of the samples I got from Arizona Rock & Mineral company.
78 I'm trying to spray with the original reddish brown from a low angle on the side (rust on sides of track)....
79 And then come back with Rustoleum Camo Ultra Flat 'Earth Brown' from directly above to color the ties.
80 The first 'brown' paint I tried turned out to have too much red/orange for good 'tie' color so now I'm trying Rustoleum Camo 'Earth Brown' (which provides a much better tie color).
81 Still figuring out a 'formula' for weathering the track.
82 The new track installed.
83 Gluing down the new track.
84 Feb 19 2018 - I am redoing/replacing the double track mainline that circles behind the (future) turntable/roundhouse area. There were issues with the Homasote subroadbed and double gapped track so I decided for a complete redo. The new trackwork is much better/smoother/reliable.
85 Feb 24 2018 - I have decided to go with a simple single paint color for the track weathering base. I found trying to get a consistently inconsistent rust color on the rail sides and then dark brown for the ties was not providing satisfactory results. I will do a base coat of Rustoleum Camouflage Dark Earth and then touch up later on to add rail rust and tie color variation using a brush or pen.
86 Close-up of the painted track
87 The yard area with the experimental rusty rail/dark brown tie experiment.
88 It took almost a week to finish the base track weathering on the lower level. My calculations indicate that's about 750 feet of the total visible track length of around 1200 ft. I would paint/clean for about 30 minutes and then air out the fumes for about 2-3 hours and repeat this cycle 2 or 3 times per day.
89 From left to right - The classification track lead tracks, the double track mainline, and the branchline to heads up to downtown Ogden.
90
91 Around the center platform
92
93 I noticed that the Rustoleum spray paint slightly melted the Owens Corning Foamular foam base even though the foam was thoroughly painted with Behr interior latex. It is very minor and it should not be a problem because it will be covered with ballast and misc ground cover materials.
94 Getting ready to install the Walthers 130 ft turntable.
95 Testing turntable fit.
96 After spray painting the turntable pit to get rid of the shiny green plastic look.
97 After moving the roundhouse onto the layout.
98 Now I need to install/wire the tracks for each of the 12 stalls (plus the 4 'garden' tracks on the left of the roundhouse and the track that will service the machine shop.
99 I will wire track feeders thru holes in the far end of the track grooves. Each pair of track feeders will go through a STDP switch to allow manual control of track power for each stall.
100
101
102 The cardboard pieces are being used to locate where other buildings will be placed.
103 From the backside with the backdrop panel removed.
104
105
106
107 April 4 2018 - Finishing up the Walthers "Railroad Shop" kit.