IMG 4220  The view of all three backdrop levels below the left 'wing'. Notice how the middle level is fairly dark in the corner.
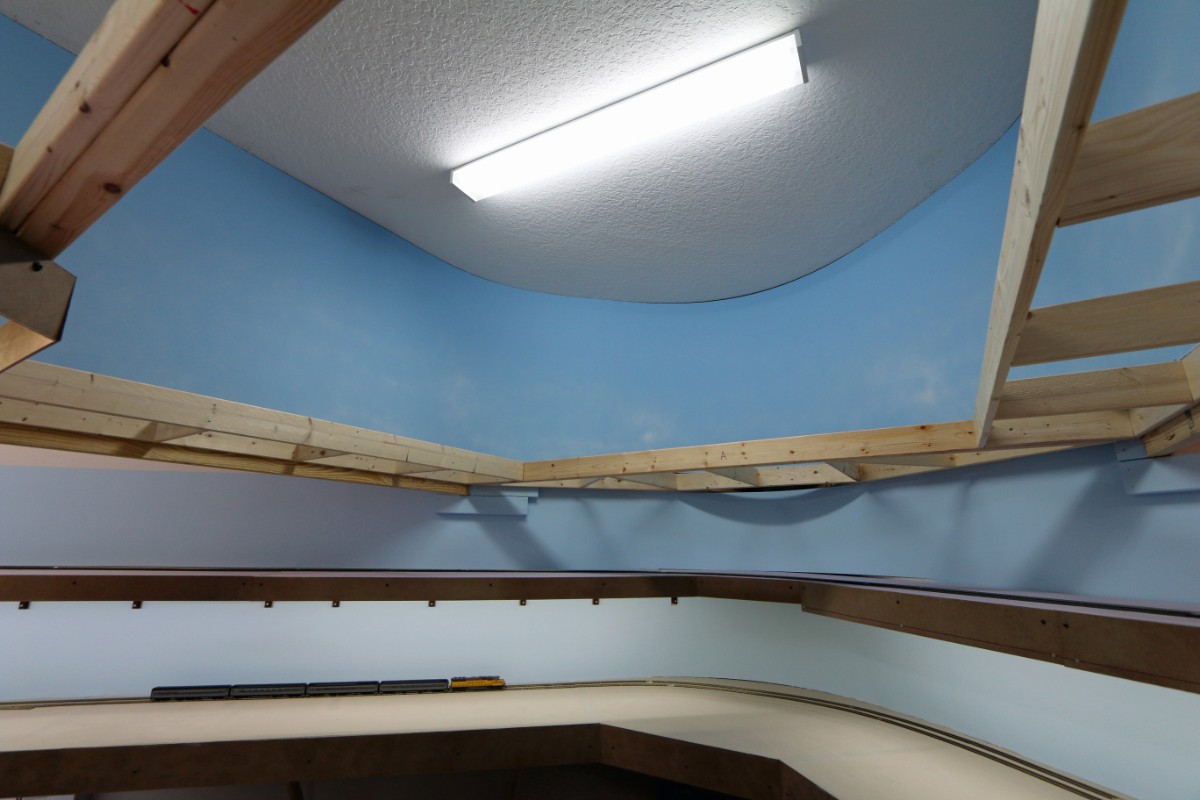
 IMG 4219  The view of all three backdrop levels below the right 'wing'. Notice how the middle level is fairly dark in the corner. IMG 4217  The right side upper level 'wing'. IMG 4216  The left side upper level 'wing'.
IMG 4215 IMG 4214 IMG 4213  Jan 1 2017 - After I spray painted some white 'haze' and removed the plastic sheets. IMG 4224  Jan 2 2017 - I installed LED strip lights for the middle level under the upper level 'wings'.  This is the right side wing.
IMG 4225  And the left side wing. I also added a short light strip for the lower level corner as there had been a dark spot there previously. IMG 4226  I am starting the cut and dry place the 3/4" plywood sub-roadbed for the upper level track. IMG 4228  There is a passing track on the mainline in the left 'wing'.  The radii of the large curve area is 42" (mainline) and 44 1/4" (passing track). 20170105 065218  There are three #8 turnouts along here (farthest to nearest: passing track return, helper engine pocket (for designated helper climb district), and Cache Valley Branch line turnout.)
20170105 065148  Jan 5 2017 - I am starting to install WS faom roadbed for the upper level mainline and passing track. IMG 4230  The upper return loop is at elevation 82" above the room floor and 52" above the center platform floor. IMG 4231  Jan 9 2017 - Construction of the upper level return loop subroadbed is complete. IMG 4233  The upper return loop and staging tracks will have exactly the same turnout ladder configuration as the lower level return loop (mainline around the outside and 5 stagiung tracks on the inside).
IMG 4234  There will be large agricultural facilities and small town (Franklin Idaho) 5" above the upper return loop track. IMG 4235 IMG 4236  The 'Nightingale Gray' paint is still drying. IMG 4237
IMG 4241  Jan 10 2017 - Paint is dry and working on the staging track turnout ladder layout. IMG 4244 IMG 4242 IMG 4243
IMG 4245  January 13 2017 - Gluing down the outside return loop track (mainline). I use DAP Dynaflex 230 clear to glue the flex track. I tack down turnouts and Atlas rerailer assemblies. IMG 4246  Shows the relative height of the return loop from the center platform floor. The center platform floor is 30" above the room floor and the upper return loop is 52" above it (82" absolute elevation). IMG 4248  The view of the helix and upper return loop from the lower main aisle. IMG 4249  The Walthers #8 curved turnout and entrance tracks for the upper return loop staging track ladders. You can also see the mainline track on the middle level level below (20" rail-to-rail elevation difference - 62" vs 82").
IMG 4250  Gluing down the first staging track loop. The second staging track has also been soldered and dry placed IMG 4251  The second staging track dry placed (not glued yet). IMG 4252  Gluing down the second staging track. IMG 4253
IMG 4258 IMG 4266 IMG 4255  Jan 14 2017 - The track for the upper return loop and staging tracks is complete. Now I'm going to start working on the mainline track leading from the bridge over the aisle to the return loop. Note the lower return loop on the left of the photo. It is functionally identical to the upper return loop. IMG 4259  Working on laying the mainline track out around the left 'wing'. There is also a passing track in this area I will be installing next.
IMG 4260  Looking from the exit of the bridge over the aisle along the mainline track. the first turnout to the right is probably going to be to service a cattle/hog farm/ranch. IMG 4263  You can see the roadbed for the passing track on the left of the mainline. IMG 4264 IMG 4351  A test/prototype of the upper return loop control/status panel.  Once I am happy with the layout and functionality of the three control/status panels (lower return loop, helix, upper return loop) I plan to have nice etched plexiglass panels made.
IMG 4352  Hinges out for access. IMG 4353  Back side of the panel. I still need to install the RR-Cirkut occupancy detection modules and status LEDs. IMG 4355  These are the turnout control boards (NCE Switch-8 mk2, Switch-It mk2, button board) that control the 10 staging track ladder turnouts. IMG 4361  Control station #3 controls/powers the Helix, Middle level center, upper level, and upper return loop.
IMG 4362  I still have some wire tidying to complete. There is just barely enough room for me to stand/work in there. IMG 4364  Here's the 'hole' in the benchwork I stand in to work on the upper level turnout control components (If I can't reach from the control/status panel access hole). IMG 4366  January 29 2017 - I finished installing the upper level mainline track from the bridge over the aisle around to the upper level return loop. I installed track feeders and the 10GA THHN track power bus as well. IMG 4367  The short track on the left is for a small steam engine service facility and endpoint of the designated helper district.
IMG 4368  The bare sub-roadbed on the left will be the 'Cache Valley' branch that heads up to Franklin Idaho (above the upper return loop). IMG 4369 IMG 4370 IMG 4372  I'm starting to add the 2x4 risers that will support the 3/4" plywood and 3/4" foam that will cover about half the upper return loop and provide the base for Franklin, Idaho 6" above the return loop track.
IMG 4373  The diagonal 1x2 shows how the backdrop partition wall will line up.  The upper level return loop on the right will be covered and on the left will be exposed (however it's 82" above the room floor so it won't be readily visible). IMG 4374  An offset mount in one of the upper return loop staging track ladders.  I ended up having to offset mount 4 of the 11 turnouts that make up the upper return loop/staging tracks. IMG 4376  This is how I install Tortoise turnout motors when there is an obstruction underneath that prevents mounting them directly under the turnout points. In ths case (the Walthers #8 curved turnout for the return loop) the LED lights for the middle level forced me to offset the Tortoise mount. IMG 4377  The 4ft level shows how much space there will be below the 3/4" plywood base/cover. It looks like trains on the staging tracks should be reasonably visible as they approach the fouling points (Atlas rerailers).  I may install an LED strip to the bottom of the 3/4" plywood in this area to improve visibility of the staging tracks, but based on this view it may not be necessary.
IMG 4378 IMG 4380 20170201 043536  A view of the space under the plywood for the upper level return loop track. 20170201 043506
20170201 043441  After cutting and placing the second piece. 20170129 130113  Feb 1 2017 - I cut and placed the first piece of 3/4" plywood that will cover about half of the upper return loop. 20170201 193145  I have decided that I need to move the diagonal wall panel in about 2 1/2" to provide a smoother backdrop corner. This means I need to make additional cuts on both pieces of plywood. 20170201 192728  Starting to work on the wall panels that the final upper level backdrops will mount to.
IMG 4381  Feb 4 2017 - The view of the new wall panels above the upper return loop as you enter the layout room. IMG 4382  The new wall panels above the upper return loop.  The 5mm door skin panels are noticeably more pink than the panels that have been installed for over a year. I will be painting all these panels the light beige room color eventually. IMG 4383  You can see all the risers supporting the plywood base (and wall panels) above the upper return loop. IMG 4384  The exposed half of the upper return loopand staging tracks.
IMG 4387  I finally finished installing the 2ft carpet tiles in the center platform. The center platform floor is about 16ft x 10ft (on one end) x 8ft (on the other end). And the helix/upper return loop Blob projects into the space by about 3 ft. IMG 4385  I plan to install 3/4" foam on top of the 3/4" plywood. IMG 4386  It's ready for the 1/8" masonite backdrop panels to be installed. IMG 4390  The Atlas rerailers mark the 'foul point' clearance locations in the staging tracks. As long as locomotives/trains don't pass the rerailer they will not foul the turnout ladder/mainline.
IMG 4391 IMG 4392  After installing the 1/8" masonite backdrop panels with coved corners. IMG 4393 IMG 4394  The backdrop is ready for the screws and seams to be spackled/faired/sanded/repeat.
IMG 4396  Feb 5 2017 - I built the 3/4" plywood subroadbed for the Cache Valley Branch line as it climbs from the mainline elevation at 82" up above the upper return loop at 88" (Franklin, Idaho).  It's about a 40 ft run of track at 1.25% grade. IMG 4397  The mainline as it passes under the Cache Valley Branchline.  The minaline will enter a tunnel right about here. IMG 4388 IMG 4389
IMG 4398  I also installed the Woodland Scenics foam roadbed for the Cache Valley Branchline.  Here's where the brnachline splits off the mainline using a Peco Code 83 #8 turnout. IMG 4399  The #6 turnout is where a spur that services a coal mine facility will be located. IMG 4400  The branchline climbs as it heads out and back in the right 'wing'. The mainline is in the foreground. IMG 4401
IMG 4405 IMG 4403  The view of the branchline passing over the mainline as it heads up and over the upper return loop. IMG 4404  The connection for the branchline subroadbed to the plywood base above the upper return loop. There will be 3/4" foam insulation above the 3/4" plywood base. 20170207 190926  Feb 7 2017 - Starting to patch/fair/sand the masonite backdrop.
20170208 053725  Feb 8 2017 - First coat of primer. 20170208 121203  Second coat of primer. IMG 4413 IMG 4410  All the upper level backdrops have been painted the basic sky blue.
IMG 4409  "Dancing Blue" sky color. IMG 4411  After spraying some white haze/clouds. IMG 4414  Feb 9 2017 - I installed the track for the Cache Valley Branchline.  It's the track on the right here.  The middle track is the mainline and the track on the left is the helper district service track. IMG 4415  The track on the left is the Cache Valley Branchline. It starts climbing a 1.25% grade here in order to get above the upper return loop/staging tracks.
IMG 4417  The branchline uses the right 'wing' to climb up to Franklin, Idaho (above the upper return loop). IMG 4418  As the branchline passes over the mainline. IMG 4420  Feb 11 2017 - The 1" foam is glued down and seams are caulked.  I have also installed a 2" tall 3/16" fascia to hide the edges of the 3/4" plywood and 1" foam. IMG 4421  It's ready to install the branchline and spur tracks that service Franklin Idaho.
IMG 4422 IMG 4423  I'm starting to work on installing the 5/8" plywood and 3/4" foam base above the lower return loop where the city of Ogden will be located.  Because the city base is about 45" deep the backdrop in this area will be removable. IMG 4424 IMG 4425
IMG 4426  Installing the risers that will support the 5/8" plywood (and foam) city base. IMG 4427 IMG 4428  I have installed the first 5/8" plywood base piece and now I'm working on fitting the (removable) backdrop 1/4" plywood panel. IMG 4429  Not a lot of clearance (5.5") above the lower return loop/staging tracks.  But I can access it from inside (underneath) and outside.
IMG 4430  I plan to build a large "high rise" interpretation of downtown Ogden in this area.  The pirates from the Great Salt Lake who founded Ogden were very successful in attracting large multi-national banks and corporations with their programs of low tax and low levels of corporate governance.  :) IMG 4431  Half of the lower return loop is still accessible by going under the benchwork and coming up in the large openings next to the removable backdrop.  I will also be connecting the track coming thru the wall from the model workshop (offsite passeneger service facility, aka 4 tracks of passenger train staging) to the spur that services Ogden. IMG 4433  Painting the removable backdrop panel the base "Brilliant Skies" blue before installing it on the layout. IMG 4437  Feb 12 2017 - I have mounted the removable backdrop and painted the room wall the base sky color.  Unfortunately the double switch wall plate and thermostat will intrude somewhat but there wasn't anywhere else feasible to mount them.
IMG 4438  I've got the second plywood base section mounted and all the risers and ledger boards mounted for the next two plywood sections. IMG 4440  Risers and ledger boards mounted. IMG 4441  Two more plywood base sections cut and placed. I need to make some small refinements to one of the plywood sections before mounting them. IMG 4442  The city of Ogden will occupy this entire plywood base area (approx 90 sq ft).
IMG 4443  After cutting and mounting the last two plywood sections I will start working on the backdrop panel that goes between the removable panel and the room wall backdrop. 20170226 050547  Feb 26 2017 - I'm working on the risers, plywood sub-roadbed and Homasote roadbed for the track that connects the branchline in Ogden through the backdrop to the 'offsite' passenger train facility (staging) in the model workshop. The steel brackets that support the middle level benchwork are in the way relative to the original track plan so I modified the track plan such that the first turnout in the model workshop yard is a right hand turnout and it will come through the hole in the wall on a diagonal allowing the connecting track to follow the right edge (inside) of the lower level staging track loops. IMG 4463  March 12 2017 - I have installed the final backdrop panel and I have begun the spackle/fair the screw holes and the edge on the left side where the panel meets the room wall. IMG 4465  I have cut/placed the 3/4"foam sheets that will make the 'base' for the city of Ogden.
IMG 4467  I built a tunnel enclosure and painted it flat black to 'hide' the inside of the layout benchwork behind the backdrop panel. This opening in the backdrop will be shielded (mostly) from view by a fairly large building. IMG 4470 IMG 4473  March 18 2017 - I have painted the last backdrop panel.  The edge between these two panels is more visible than 'ideal' but the panel on the right is removable from the back side and the left panel is positioned at an oblique angle which required a mitered cut.  1/4" luann plywood does not miter cut as well as thicker plywood. IMG 4475  I am going to have a 24"X20" removable section of foam that will allow me to stand here when I need access to the middle level above here for construction and maintenance purposes. I was originally thinking about having a permanent piece of 3/4" plywood here but then I realized using a piece of removable 3/4" foam would be a MUCH better idea.
IMG 4477  The removable section with the 5/8" plywood underneath. IMG 4478  The view from behind the backdrop of the lower return loop track and the elevated track that connects the city level track to the 'offsite' passenger staging tracks in the model workshop. IMG 4482  The view when standing in the 'removable' foam area on the benchwork. IMG 4484
IMG 4485  Gluing down the next section of 3/4" foam. IMG 4480  Here you can see the 'tunnel box' where the connector track goes through the backdrop on its way into the model workshop.  The tunnel box is painted flat black inside and just sits on the 5/8" plywood benchwork on the left end and horizontal screws on the right side so it is removable. IMG 4487 IMG 4488  The tunnel portal for the double track mainline and entrance to the lower return loop will be located somewhere around here.
IMG 4490 IMG 4492  March 19 2017 - After caulking the seams and painting the foam base.  This paint color (Nightingale gray) is mostly to just hide the purple foam but it will also provide some color for underneath the track that will be installed directly onto the foam. IMG 4493  The lower return loop and 5 staging tracks. IMG 4495  I installed 1.5" tall masonite fascia along sections where I want access to the lower return loop underneath and 12" tall fascia where I can access the double track mainline from underneath the benchwork.
IMG 4496  The removable foam panel that I can take out if I need to stand on the benchwork to work on the middle level above. IMG 4497 IMG 4499 IMG 4500  I combined two Downtown Deco 36"x2" warehouse flat kits along the wall as a proof of concept. I plan to have about 14-16 ft of narrow depth/flats warehouses/industries along that stretch of wall.The combined warehouse kit is 72" long.
IMG 4503  There's plenty of space along the wall for more structures. IMG 4505 IMG 4507 IMG 4509  I ran a 12ga track power bus and a bunch of track feeders for all the track in the city.  I also connected to the track in the model workshop and I was able to run trains in/out of the model workshop form the main layout room.
IMG 4498  March 25 2017 - I have finished installing all of the track that will service Ogden (and connect with the staging yard in the model workshop).  This area on the right will be a highrise downtown city scene with large buildings up to 40"-44" tall. IMG 4501 20170401 120723  I mounted additional vertical 2x4s to provide more support for achieving a smooth curve of the 1/8" masonite panels. 20170401 120744  April 1 2017  - Starting to work on enclosing the helix. First I installed additional wood framing for mounting the 1/8" masonite panels.
20170401 122947  This is where the helix display/control panel will be mounted. 20170401 131721  Mounting the first panel. IMG 4510  All the 1/8" panels are mounted andnow I'm working getting the screws counter-sunk appropriately in order to patch/fair them. IMG 4512
IMG 4513  I needed to purchase one additional 1/8" masonite panel which is a different color than the original 25 panels I ordered whern I started the layout construction. IMG 4514 IMG 4515  First step of patching/fairing the screw holes and seams. IMG 4517
20170405 044715  . IMG 4518 IMG 4516 20170405 044641  April 5 2017 - Finished patching/fairing/sanding the screw holes and seams. Wiped it down with a damp rag and now it's ready to prime.
IMG 4519  The helix as viewed thru the opening where the helix display/control panel will be located. HelixDisplayPanel  This is my first design proposal for the display/control panel for the helix.  The mainline enters the helix on the bottom right and then splits into two tracks.  The outer helix track (upward traffic) has a 40" radius and the inner helix track (downward traffic) has a 37.5" radius.  There are 4 1/2 laps to the helix plus lower and upper entrance/exit tracks.  Each 'lap' of each track will be an occupancy zone so there are 18 zones in the helix plus 3 zones for each of the entrance/exit tracks for a total of 22 occupancy zones. 20170404 051642  This is the updated design proposal template for the helix control/display panel. IMG 4537  I have removed these (removable) backdrop panels in order to paint their backsides the Gauzy White wall color.
IMG 4536  I have removed these (removable) backdrop panels in order to paint their backsides the Gauzy White wall color. IMG 4533  After painting the enclosure the Sherwin Williams SW6035 'Gauzy White'. IMG 4532  After painting the enclosure the Sherwin Williams SW6035 'Gauzy White'. IMG 4527  Very white!  I can't wait to paint all those pink wall panels.
20170407 05051-c  April 7 2017 - Panorama photo from inside the enclosed helix. IMG 4525  2 coats of primer. I use two coats of Zinser primer on the masonite because the Masonite is very dark and it has a glossy finish. IMG 4522  After 2 coats of primer. All of the 'pink' wall panels will be eventually painted the same color as the room walls and the helix enclosure: Sherwin Williams "Gauzy White" SW6035. IMG 4540
IMG 4539  I'm starting to patch screw holes and seams in the wall panels around the upper level in preparation for painting them IMG 4541  April 9 2017 - I've painted some of the wall panels that drop from the ceiling the room wall color 'Gauzy White'.  On the right side here I have attached a strip (pink) on the end cap that I need to caulk and paint. IMG 4542  The view while on a 3ft step ladder. IMG 4543  I plan to install trim molding along the top of the wall panels at the ceiling joint.
IMG 4544  I plan to install trim molding along the top of the wall panels at the ceiling joint. IMG 4545 IMG 4546 IMG 4549  I have six sections of track in the lower/middle levels around the center platform where turnouts on the mainline connect with service/spur track that will be mounted directly to the foam base. They require transition sections of roadbed to drop down from the 3/16" Woodland Scenics 'mainline' foam roadbed. I use cork roadbed for these tapered transition sections and they are 24-26" long.  I will add caulk at the end of the cork to finish the transition.
IMG 4547  April 13 2017 - I'm starting to work on the next upper level wall panels.  Patching/fairing/sanding and then primer/paint. IMG 4553 IMG 4550 IMG 4556  April 15 2017 - I painted the next (right) section of upper wall panels.
IMG 4555  It looks much better (finished) looking with the ugly pink panels painted room wall color. IMG 4558 IMG 4559  April 23 2017 - I painted another section of the upper level wall panels. They are on the left as you enter the room. IMG 4561  I also painted the raw cut edge of the plywood base roadbed of the upper return loop and the perimeter 2x4 risers that support the plywood/foam base of Franklin, Idaho above.
IMG 4563  Eventually I am going to have to decide what color I am going to paint the fascia masonite. It will probably either flat black, dark brown, or dark green. IMG 4564  The visible portion of the upper return loop and staging track loops.  It's not visible from the floor of the main aisle. 20170701 062052  June 20 2017 - When I needed to purchase more Foamular rigid insulation sheets for above the upper return loop Home Despot was out of the 3/4" sheets so I bought/used 1" sheets.  The 1" sheets are much stiffer and they had some 'bowing' that I could not eliminate when I glued them down.  Therefore I had to make 'cuts' though the slight hills in order to flatten them for track laying.  You can see the 'cuts' beyond the turnouts. 20170701 072014  July 1 2017 - Before redesigning and rebuilding the mainline track as it exits the Ogden yard.
20170701 072115  Theorizing how a #8 right hand and #8 double slip switch might work to provide a turnout leading into the Oregon Short Line. 20170701 072720  After pulling up the old track and foam road bed. 20170701 111426  Gluing down the Woodland Scenics foam roadbed using DAP DynaFlex 230. 20170702 060200  Using caulk to smooth out the rough foam.
20170703 072336  I used the opportunity of laying another mainline track to flatten out a slight hump in the homasote for the mainline track. 20170703 072354  Working on laying the new inside mainline track. 20170703 110422  Installing the 'inside' mainline track. 20170703 110457
20170703 160542  Gluing down the new Oregon Short Line mainline track. 20170703 160603  Gluing down the new Oregon Short Line mainline track. 20170703 160646  The new double track mainline as it runs behind what will be the turntable/roundhouse area. IMG 4751  July 9 2017 - I finished caulking the edges/seams of the lower and middle level foam and painted them to hide the purple/pink foam insulation color. I also began placing the service spur track in these areas as well.  I also painted the bracket that supports the middle level shelf.  I need to install/paint the brackets for the other two corners.
IMG 4764 IMG 4763 IMG 4762  I finished laying the track and turnouts for Franklin Idaho at the end of the Cache Valley Branch above the mainline upper return loop.  I still need to fill in missing ties where flex track joints are. IMG 4760  The outskirts of Brigham City will be located on the left.
IMG 4759 IMG 4757 IMG 4754  There will be two classification yard arrival departure tracks on the left here (As well steam locomotive server facilities). IMG 4753  When I originally designed the layout I wasn't sure whether I was going to model Pocatello to Butte or the Oregon Short Line from Ogden to Cache Junction and the Cache Valley branch line.  Since I chose Ogden/OSL/Cache Valley I subsequently redesigned the double track mainline as it leaves the Ogden yard closer to the prototype. This double track mainline represents 'West' of Ogden headed towards Nevada.  The OSL turns off on the left side here.  The 'right' mainline track is electrically isolated with a 16" stretch of 'dead' track and will be setup as a DCC programming track. The 'left' mainline track is electrically dead to minimize chance of locos running off edge of layout. :)
IMG 4755  Closeup of the OSL interchane Walthers #8 double slip turnout. IMG 4752  I am using Micro Engineering code 70 track and Micro Engineering code 70 #6 turnouts for the service spurs.  I still find the Micro Engineering track to be extremely difficult to get smooth flowing curves (compared to the Atlas and Peco flex track). IMG 4824  A wider view of the lower and middle levels. IMG 4825  A wider view of the lower and middle levels.
IMG 4808  A wider view of the helix control/status panel. IMG 4809  Aug 4 2017 - I used a 12" piano hinge to mount the control/display panel for the helix area and I used a magnetic latch to hold it closed. IMG 4810  The view of the helix with the panel door open. IMG 4813  It's an amazing model.
IMG 4814  I plan to locate the Laser 3 Modeling "John Murray & Sons Coal Distribution" craftsman kit in this location. I have installed the spur track that will service this facility. IMG 4815  I have shaped/glued/wired all the Micro Engineering code 70 service/spur track around the center platform on the lower and middle levels. IMG 4816  It took quite a while to figure out how to shape the Micro Engineering track so it has reasonably smooth/flowing curves. I have also caulked/painted the remaining two shelf support brackets that support the middle levels on the corners of the center platform. IMG 4817  There will be numerous businesses/industries supported by the track around the cednter platform on the lower/middle levels.
IMG 4818 IMG 4819 IMG 4820  The middle level with the exit from the helix on the left. IMG 4821
IMG 4822 IMG 4823  The outskirts of Brigham City will be along here.