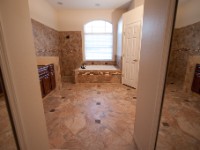
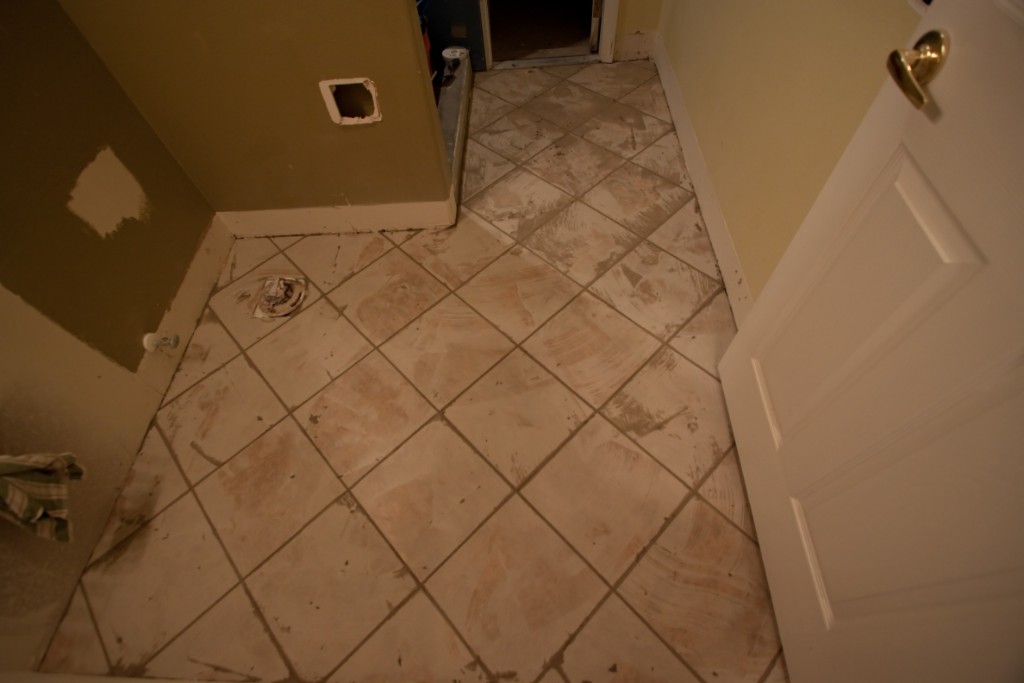
 1 This is a 'before' photo of the pool bathroom. Note the cheap vanity, plain beige tile, and ugly pea green paint. Blech. We plan to replace the floor tile, replace the vanity, install a granite counter top, replace the shower tile and the shower door, repaint, and replace the baseboard. |
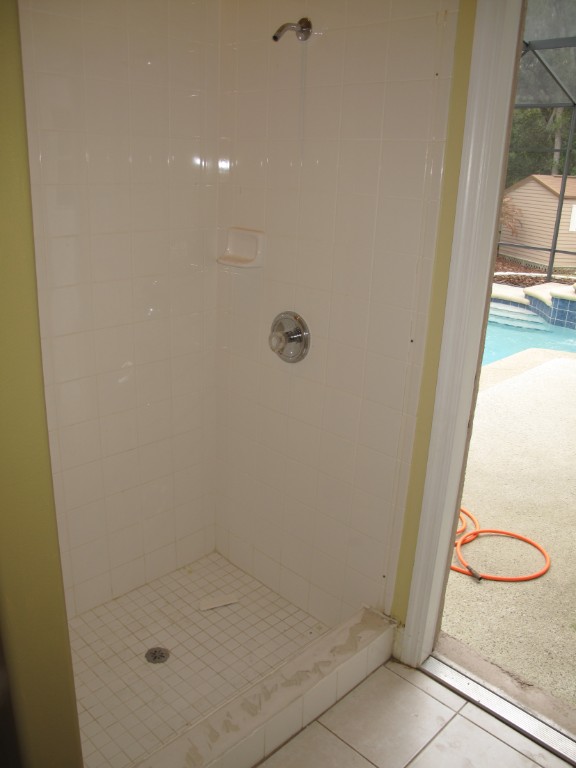
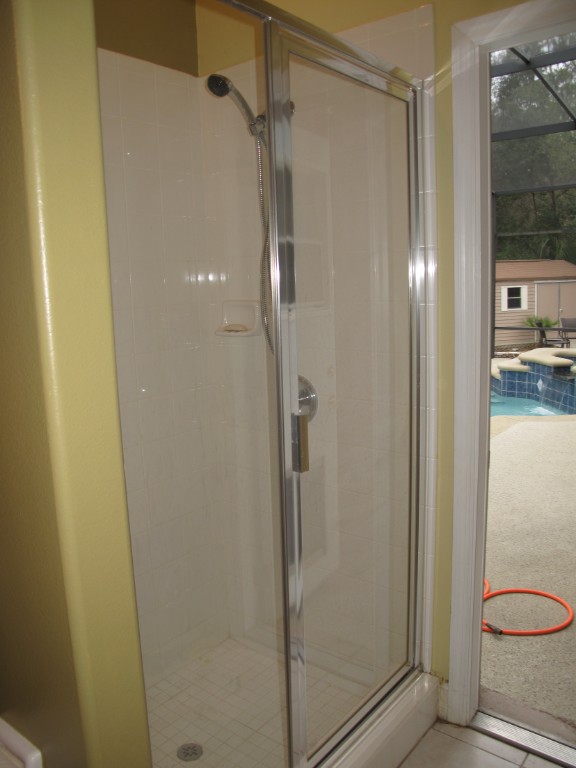 2 And here's the shower that will be destroyed and then eventually retiled. |
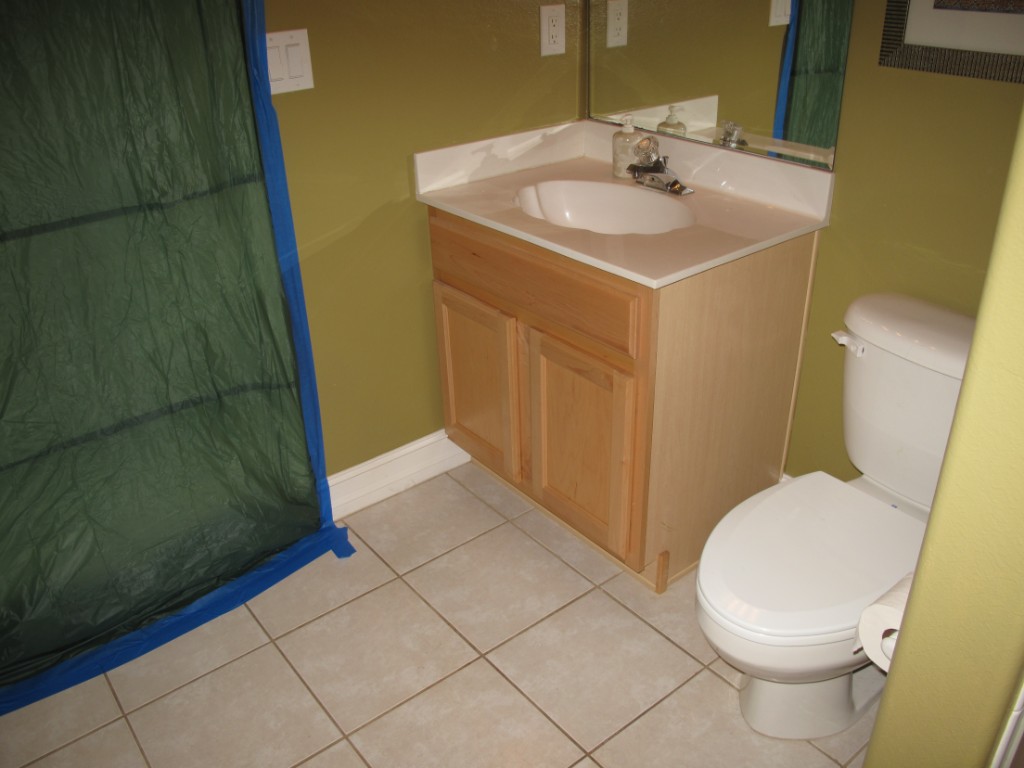
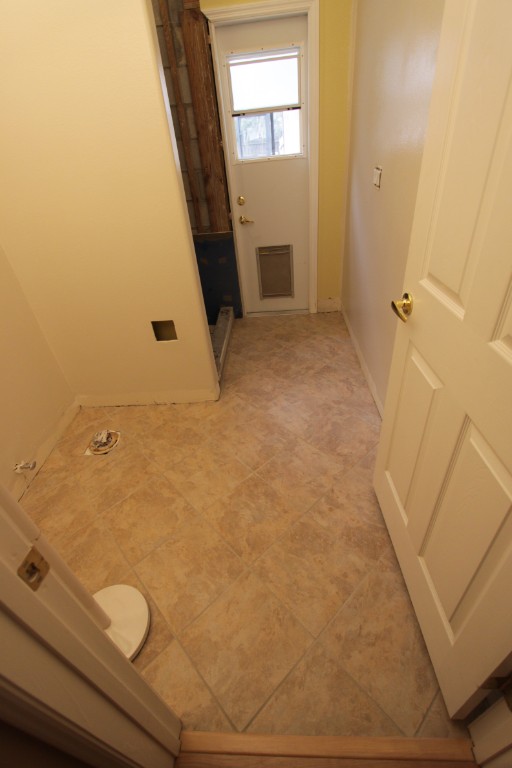
 3 Another 'before' photo. One of the first things I did was to 'hermetically' seal the door into the house. Not that it kept much of the dust out of the house, but I tried. |
 4 |
 5 Here are samples of the tile we chose for the shower. They are all in the same family Pietre Del Tibet from Gambarelli (Italy). |
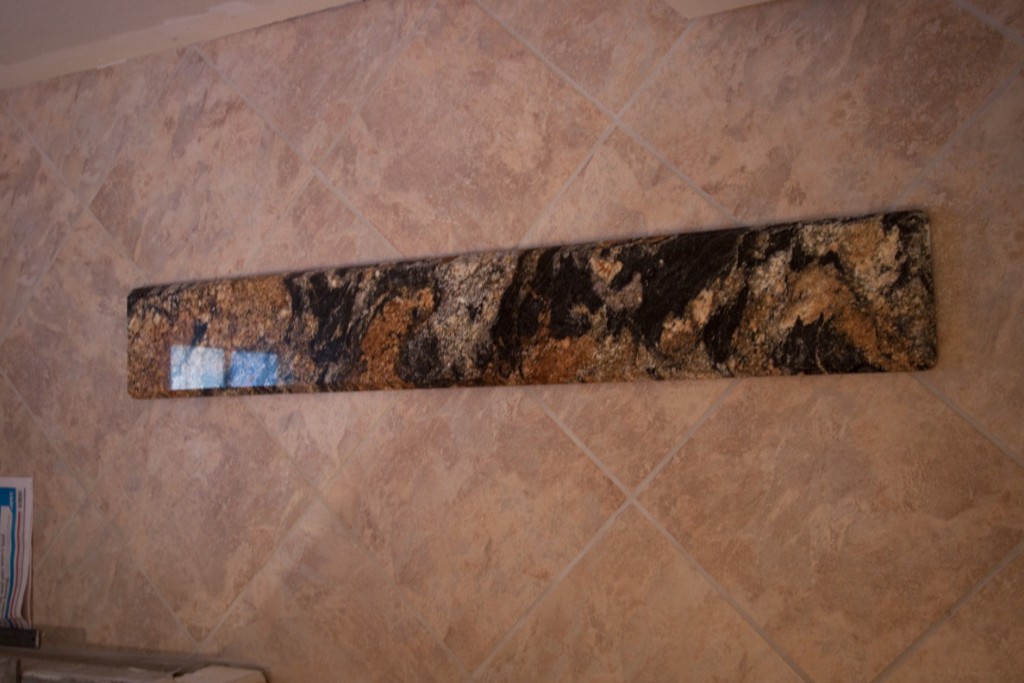
 6 Here is the granite remnant from Stone Crazy that Kelly chose for the pool bath (and the third choice was the charm!). |
 7 After removing the glass shower door. |
 8 I attempted to get the tile off the shower walls but as predicted the greenboard backer board just came apart. So I decided to go with the 'Remove whole wall sections tile and greenboard together' strategy. This strategy was much more effective. |
 9 I used the air chisel to break up the tile on the edges and corners and then I used the angle grinder to cleanly cut the edges of the drywall sections. |
 10 |
 11 20 minutes later, all the shower tile was gone. Can you spot the blood stains near the edge of the drywall on the back wall? |
 12 It done been 'blowed up'. |
 13 Oh no, the perimeter has been breached! Alert! Alert! |
 14 |
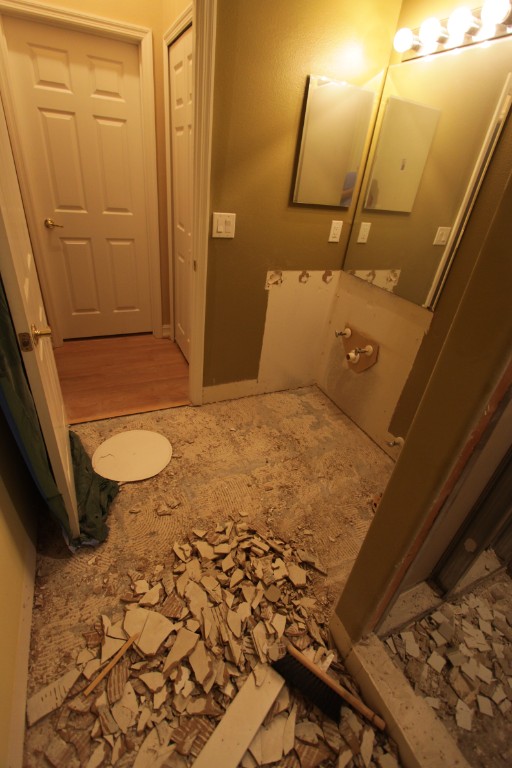
 15 After cleaning up the pile of broken tile shards. |
 16 As you can see, I was able to remove LARGE sections of shower wall tile in complete sections. |
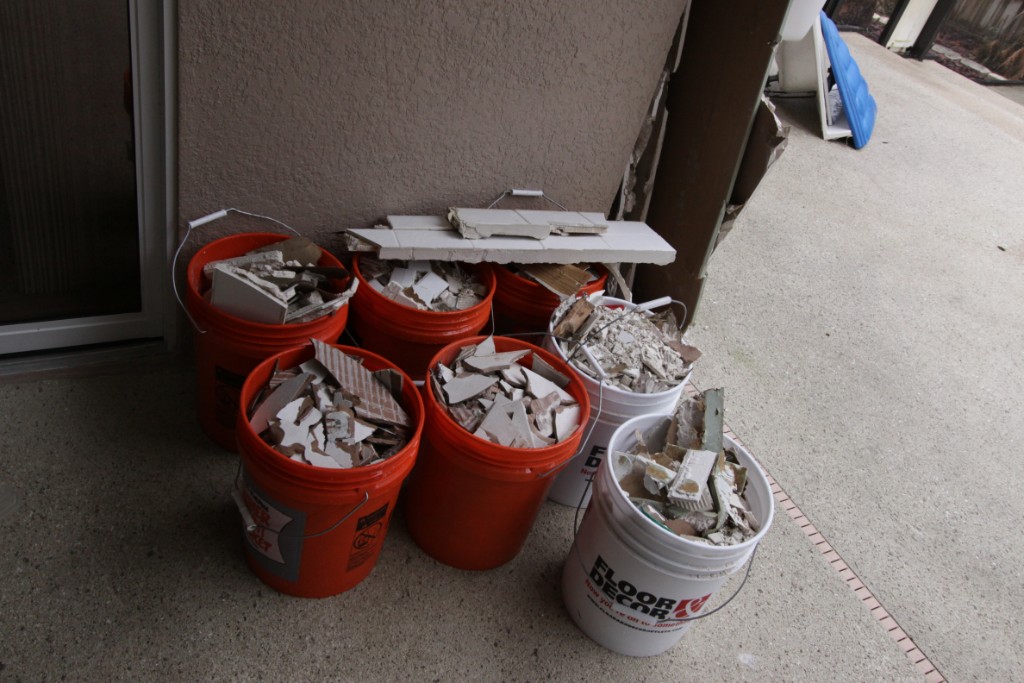 17 Many many 5 gallon buckets were required for this adventure. |
 18 I decided to use Georgia Pacific "Densguard" (sold at Lowes) as the tile backer in the shower. http://www.gp.com/build/product.aspx?pid=6388 However I suffered from 'premature tile backer board installation' because I later realized that we were replacing the shower fixture so I needed to replace the valve assembly. Which is behind the tile backer board. As noted philosopher Homer once said: "D'ooooh!" |
 19 |
 20 I used cement backer board to rebuild the shower curb. |
 21 Yes that's still the old shower fixture valve sticking out on the right side shower wall. Old dummy didn't realize his mistake until after mudding/taping/sealing the backer board. |
 22 Because we planned to lay the floor tile on the diagonal I need a decent tile saw to make the many diagonal cuts. This QEP 24" Bridge saw was the best option I could find locally for a reasonable price. I bought it from Lowes along with a super premium Dewalt wet tile saw blade. This combination was absolutely amazing (compared to the POS tile saw I had been using). This saw will cut 24" rips and 16" tile diagonals. This could come in handy when we redo the master bathroom later this year. |
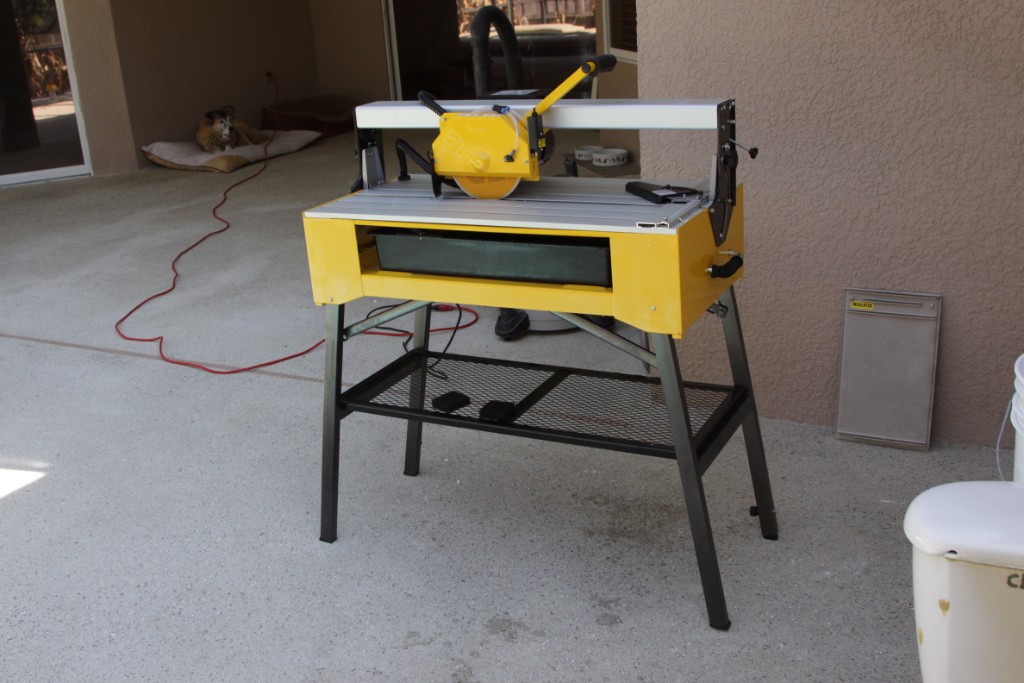 23 The QEP saw worked flawlessly for this small job. |
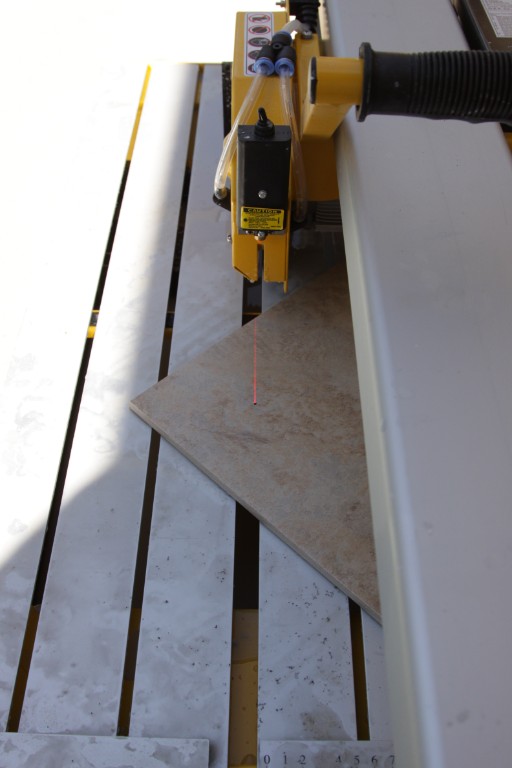 24 After calibrating the saw/blade the saw could cut so precisely that there would be a small smudge of black sharpie mark on both pieces of cut tile. |
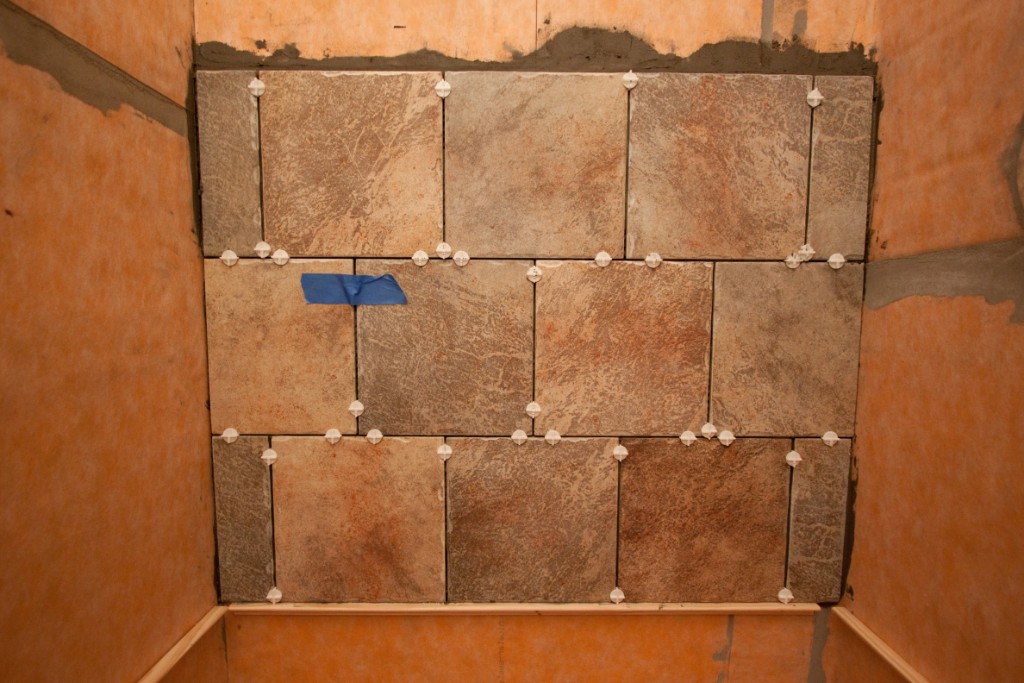
 25 First I cut and placed all the tile. |
 26 After cutting and placing the tile. |
 27 After installing the tile 'for real'. I learned a very valuable lesson while laying this tile. It sounds simple, but.... Begin laying the tile in the correct location regardless of where the 'important' view and reference line is. |
 28 Groutapalooza 2010 -- We used a slightly grayer grout in the pool bathroom compared to the browner grout we used in the office/guest bathroom. This was to bring out the gray in the floor tile and to complement the grayer color palette in the shower tile. |
 29 More grout haze needs to be sponged off. |
 30 Grouting is basically done. Still got a little bit of residual grout haze to sponge off. |
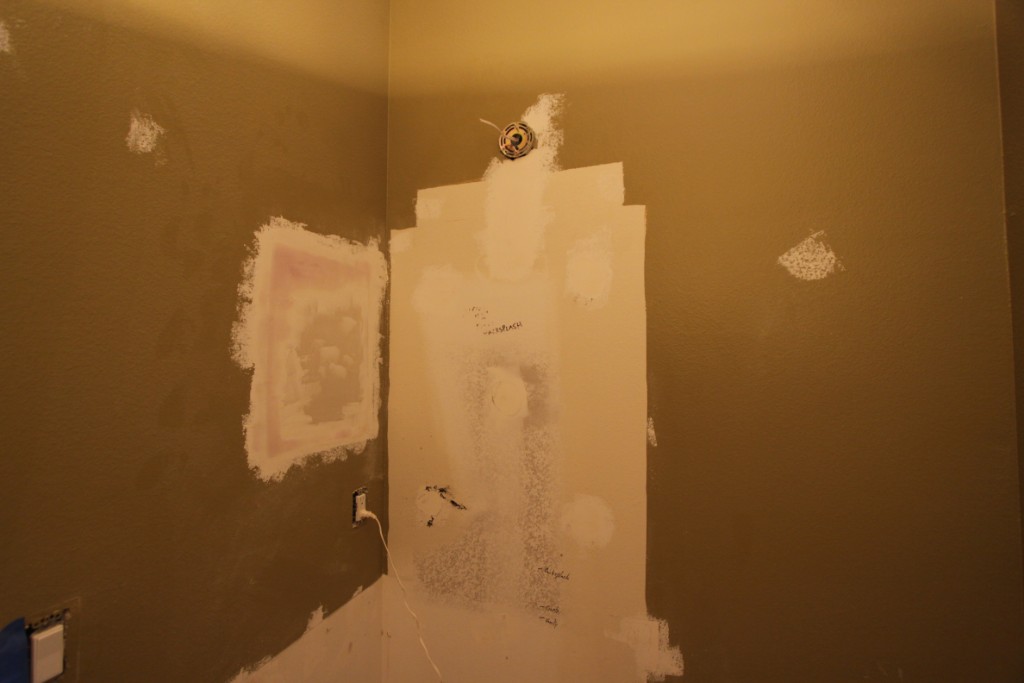 31 Starting to work on the drywall issues. Again as in the guest/office bathrrom we removed an ugly medicine cabinet on the left wall. |
 32 Preparing for another recessed TP holder. |
 33 Holes in the wall where the ugly white porcelain towel hangar brackets used to be. |
 34 At least this bathroom didn't require significant plumbing work for the new vanity/sink. |
 35 My first attempt at 'sweating' copper in order to install the new shower fixture valve. I was nervous about doing this myself. My copper sweating turned out ok. However doofus didn't use enough white plumbers tape where the copper fiitings screw into the brass valve so they seep tiny amounts of moisture. Grrrrr. Darth Brad says my "Rube Goldberg Adventures in Copper Plumbing" needs to be rebuilt. No thanks. I'm going to rebuild using SharkBites and CPVC. I know and love working with CPVC. |
 36 After the primer coat of paint. |
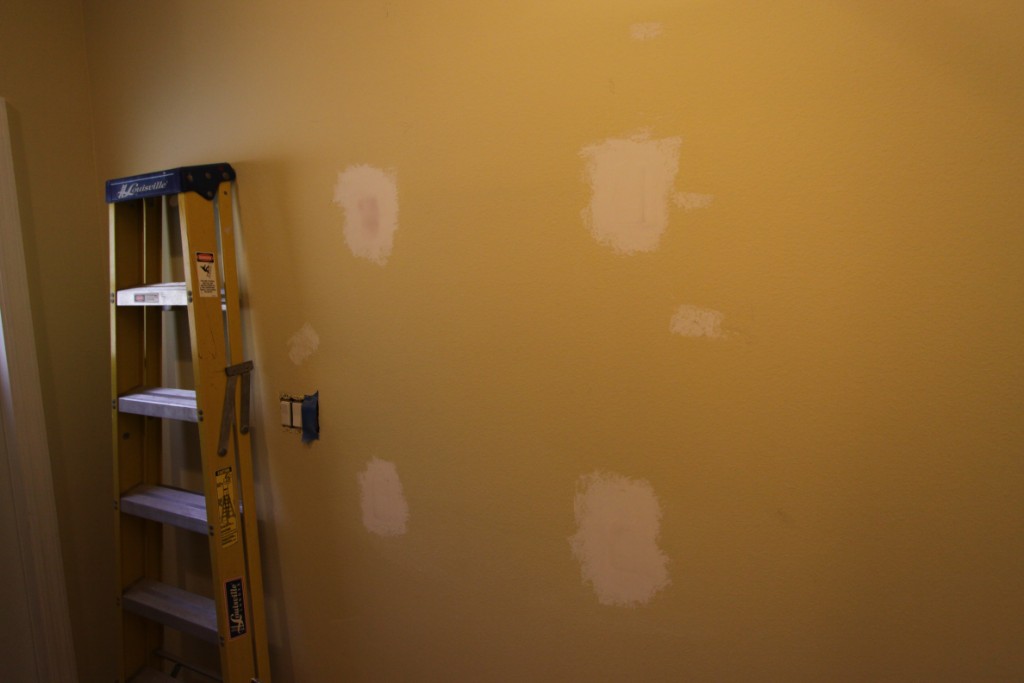
 37 The drywall repairs turned out pretty well. |
 38 My completed yet leaky copper plumbing. Soon to be replaced by SharkBites and CPVC. Viva le CPVC! |
 39 First coat of the Behr 'Sandstone Cove' paint. |
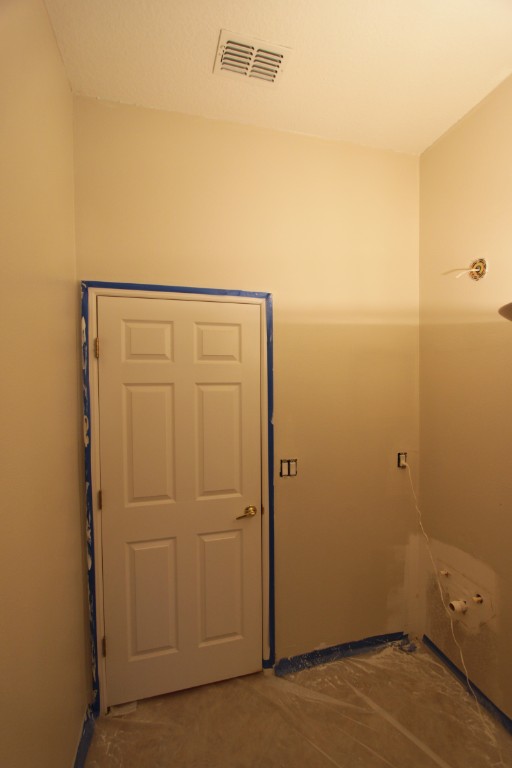
 40 After the 2nd coat of paint and all the tape and drop cloth removed. It's ready to install the new vanity! |
 41 |
 42 You can see the old yellow paint on the left side by the door which will be dealt with once the shower is finished. |
 43 The new light fixture and vanity installed. |
 44 |
 45 And the new granite counter top. We chose to include a 'banjo' on the counter top to extend it over to the corner above the toilet. This makes a nice shelf for female oriented decorative crapola. But it looks real nice. :) |
 46 This is the granite sill for the (unfinished) shower curb. |
 47 The banjo counter top shelf does not at all interfere with toilet functioning. |
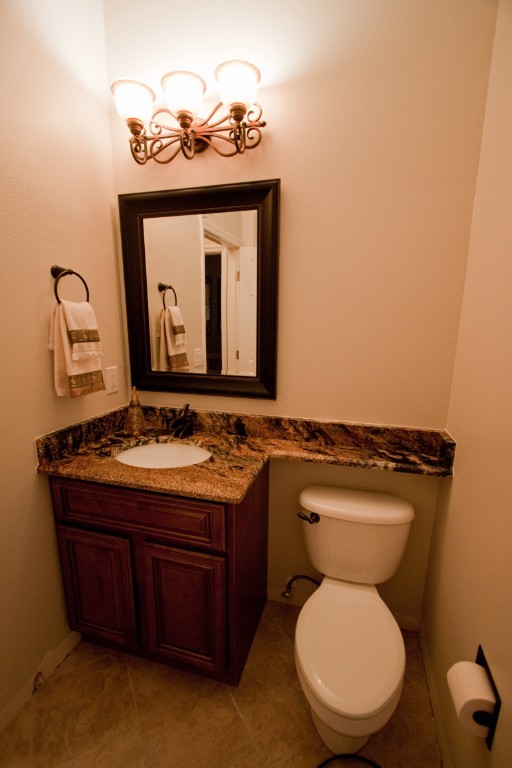 48 Mrs FishDug is starting to accessorize to pool bathroom vanity area. I sense candles and other crap on the way.... |
 49 |
 50 I 'hermetically' sealed the shower area from the rest of the bathroom while I get back to work on the shower. The plan is to mud the shower floor, install the Kerdi drain, and then install the Kerdi membrane system on top of the Densguard. And then start tiling the shower. |
 51 The shower valve plumbing redone in CPVC. The feed pipes coming out of the wall/foundation were CPVC so there was no need to use a SharkBite for a copper->CPVC transition as I had expected to need. |
 52 The first task is to install a real shower drain. This requires chiseling out the dry pack mortar around the existing 2" PVC 'drain'. |
 53 I used a Mark E Industries 'Quick Pitch' kit to handle the 1/4" per 1 foot slope required for proper shower drainage. I used a sharpie to draw a level reference line between each corner to provide guidance as I worked the mud. |
 54 Closeup of the Quick Pitch product. One final cleanup/vacuum of the floor and it's ready for some mud. |
 55 I made a mud mix of 4 parts sand and 1 part portland cement. I probably made it too wet to be a 'proper' dry pack mortar. Oh well, it seems like it work ok for my needs. I also installed the exalted (and expensive) Kerdi shower system drain. Because the Kerdi drain's lower flange has a larger diameter than the Quick Pitch center ring I mudded all four quadrants very close to the center and then used the PVC cutters to snip out the Quick Pitch center ring. This allowed the Kerdi drain to fit comfortably. I need to finish the drywall work around the edge and then it will be ready for the Kerdi membrane installation. |
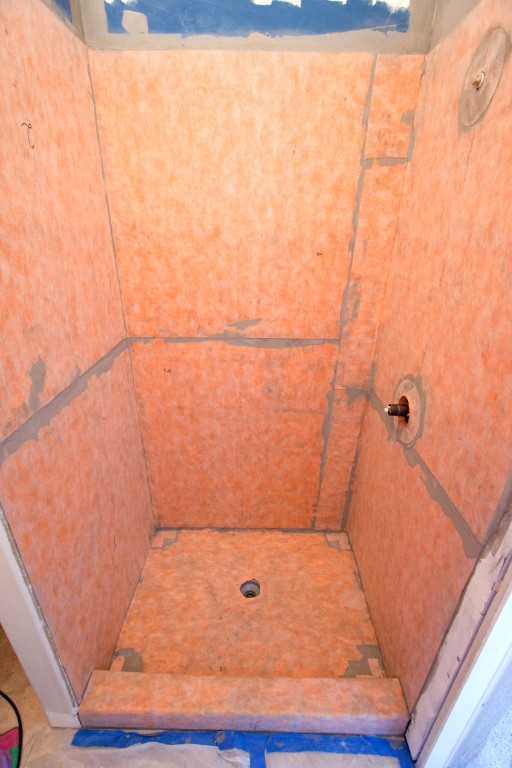 56 A couple of days later Kelly helped me install the Kerdi membrane on the walls and curb. Here it is the next day after the thinset has cured. The shower is ready to start installing tile. However before installing any shower tile I performed a test to verify that the Kerdi membrane is water tight and that the shower floor drains properly. Both tests passed. |
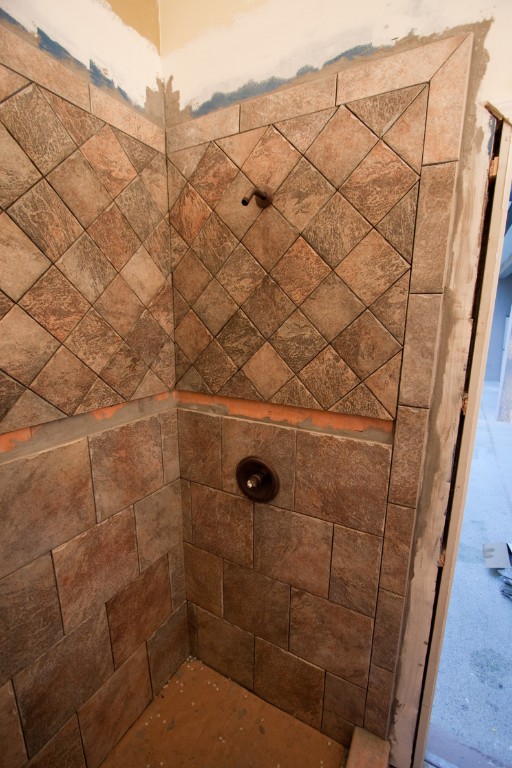
 57 This is the tile pattern I have planned for the shower. Starting from the bottom it's basically 4 layers of 12" overlapping tile, the decorative band, 4 layers of 6" tile set on the diagonal, and then matching bullnose edge tiles. Since I'm a complete tile newbie I thought I would keep it simple for my first shower. Yeah, that's the ticket. |
 58 Tilemaster Darth Brad said that I should first install the outside edge bullnose tiles in order to ensure they are perfectly lined up. So I installed the outside bullnose tiles except for the top one on each side that will be miter cut 45deg to meet the top edge of bull nose once the walls of the shower are complete. I used Versabond fortified thinset and I had no problem getting the tiles to adhere to the Kerdi. Next I installed the perfectly level ledger boards on the three shower walls and then I installed three rows of 12" tile to the back wall. So far so good, I am going to really take my time installing the shower tile, |
 59 |
 60 I'm using 1/8" spacers for the shower tile. The color variation of this tile is readily apparent with the mixture of grays, browns, and oranges. |
 61 I installed the 12" tiles on the left and right walls. Except for very special tile #R9. I lay all the tiles out on the floor in the desired pattern and attempt to arrange them in a pleasing manner and then I number them so I know where each specific tile is supposed to go on the predefined pattern. Tile #R9 is very special because it has the Kerdi shower valve opening inside it's perimeter. And I have basically no idea how to cut a 5" diameter hole in a 12" porcelain tile. :( |
 62 Yesterday I completed the bottom row of the 12" lower tile and I successfully cut an appropriate hole inside tile #R9 and installed it. This afternoon I installed the 6" tile on the diagonal on the back wall. While installing the 6" tile on the diagonal I found that I needed some sort of thing-a-ma-jobber that would keep the tile pressed inward along the side walls. The yellow QEP LASH wedges snipped to the appropriate length worked GREAT! |
 63 You can see the yellow LASH wedges better in this photo. At this point I think I have 4 tiling 'sessions' left. 1) 6" diagonal tile on left wall, 2) 6" diagonal tile on right wall 3) Bullnose edge along top perimeter, decorative band, curb tile, 4) shower floor tile. I assume I will grount the wall tiles before laying/grouting the floor tile. |
 64 This was right after I finished the upper left and upper right walls as well as the bullnose around the top edge. |
 65 |
 66 The next morning I removed all the spacers and ledger boards. It's now ready to install the decorative band and curb tiles. |
 67 |
 68 |
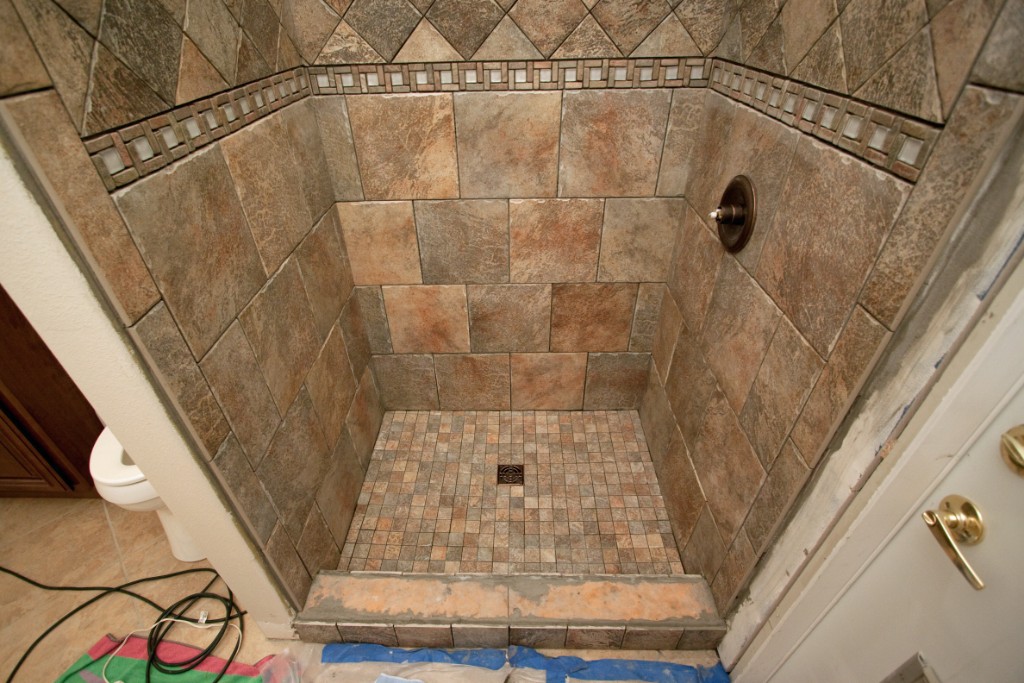
 69 I installed the decorative band and curb tiles today. |
 70 When we had the granite counter top made we also had a matching granite sill made for the shower curb. When the sill was fabricated it was made several inches too long with the understanding that once the tile was done the sill would be cut down to the precise dimensions required. So now that the tile is installed I can take measurements and the granite sill can be cut to exact size. |
 71 |
 72 |
 73 |
 74 |
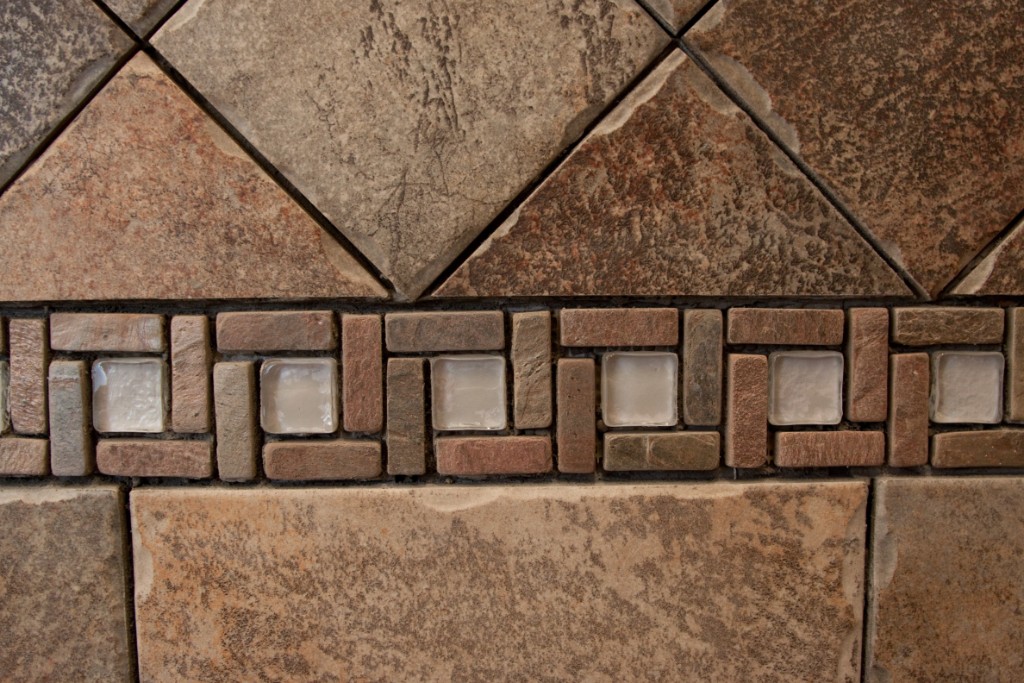 75 Here's a closeup photo of the decorative band/listello that I took in order to ask a question on the the John Bridge tile forum about sealing the mosaic tile in the decorative band before grouting. The mosaic tiles on the decorative band are unglazed so there appearance changes dramatically when they are wet. We prefer the darker wet look so I am going to apply an enhancer wet look sealer before grouting. |
 76 Another 'before' sealer photo. |
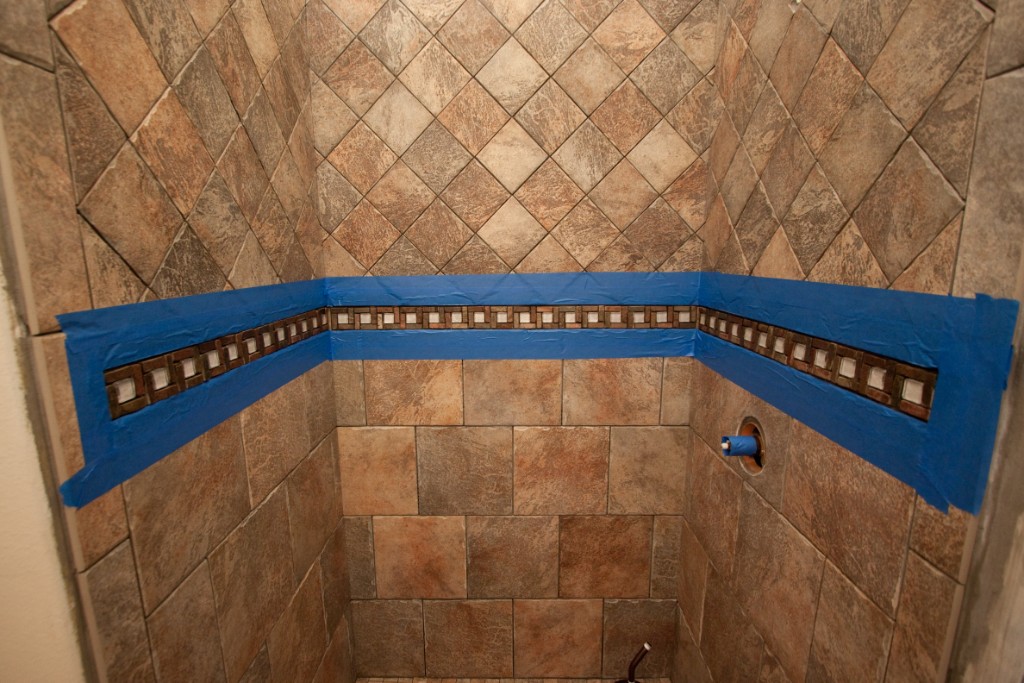 77 And here I have the decorative band taped off when I applied the 'stone enhancer & sealer' product. |
 78 And this shows the appearance after the sealer has been applied. The decorative band has a lot more 'pop' now. |
 79 I grouted the upper walls and decorative band last night. I used Laticrete Permacolor 'Hemp' color grout. I'm real happy with the grout color so far. |
 80 |
 81 I will need to reseal the unglazed tiles on the decorative band after I have removed all the grout haze. |
 82 I grouted the lower half of the shower walls, both sides of the curb, and the shower floor last night. I have also dry placed the curb sill granite to get a feel for how it will look when it is installed. |
 83 |
 84 The next steps in this adventure are to finish off the drywall around the shower, install the shower sill, caulk as needed, and then paint the drywall area around the shower. |
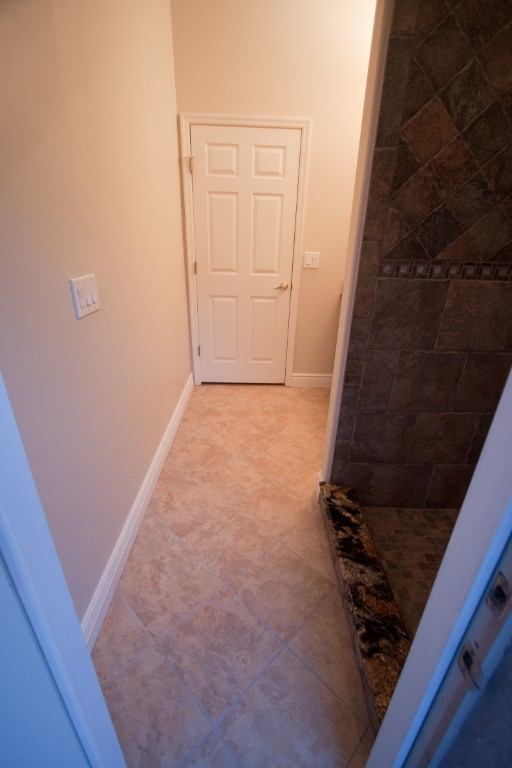
 85 This weekend I finished painting, installed the granite sill, caulked the outside edge of the shower tile, and installed the baseboard. So it is basically done except for the glass shower door. |
 86 |
 87 |
 88 |
 89 |
 90 |
 91 Oh, I forgot that I still need to paint the baseboard. |
 92 I chose to get a temporary shower curtain while we wait for the glass door to be installed. ;) And I opted for the matching floor mat as well. |
 93 "Ode to thinset days gone past." |
 94 Finally got around to having a seamless glass door installed. I had a shower glass company do the installation because I wasn't sure about drilling into the porcelain tile (and the not perfectly square nature of the shower door opening). |
 95 It looks much nicer with the glass door. Not to say that the temporary shower curtain wasn't good looking. :) |