
Model Trains
Photo Album of new layout construction
Photo Album of my parent's Garden Railway and basement layout.
I began to study the feasibility of building a model train layout because I need to find ways to spend less time in the intense Florida sun. I enjoyed working on the HO scale layouts my father built while I was growing up. I spent the about a month or so researching the different model train scales (N, HO, etc), model train technology and layout design. The first decision I made was that I would use a DCC control system since I have no investment in legacy equipment. Because I work in the software development field, the DCC technology is relatively easy for me to understand and to appreciate its power and flexibility.
Because I am 'limited' to what I can fit into an 11'5"x11'2 bedroom I first explored N gauge equipment and layout designs. I purchased a couple N gauge locomotives, a simple oval track, a Digitrax Zephyr and spent a couple weeks reading, playing and designing. John Armstrong's books on layout design were excellent and I came up with some nice layout designs. But eventually I decided that I didn't get any 'satisfaction' with the small size of the N gauge equipment (Installing a DCC decoder with soldered connections in an N gauge steam loco was enough to convince me that bigger might be better). Plus I am just starting the need reading glasses, so N gauge is just too small. I decided that I would make a more strenuous effort to come up with a HO scale design that I could live with.
I am using 3rd Planit's layout design software which is very powerful, but it has a steep learning curve.
My goal was to come up with a layout design that has both point to point and continuous operation modes. One of the compromises I accepted to go with HO gauge was that I would use a 'duck under' table (It's more of a crawl under) and I also wanted a design that would not block off access to the closet! My final (current) design is basically a double track double loop with a small yard and spurs on the main (lower) level and a large switching yard on the top level. I use a helix to move trains from the main level up 16" in elevation to the top level. The minimum radius on the main line is 24" and all curves use spiral easements. The double loop on the main level has a maximum grade of 1.4% while the grade on the helix is 2.4%. All crossovers and turnouts used on the mainline path are #6 or larger. The helix has a rail-to-rail clearance of only 3 3/4" inches, so I am going to use doubled up 3/16" door skin panels and 1/8" Homabed to maximize the available clearance. The 'normal' entrance to the helix from the main level loop is in the counter-clockwise direction. A Shinohara #7 curved turnout permits entry onto the helix when traveling in a clockwise direction on the main level double loop.
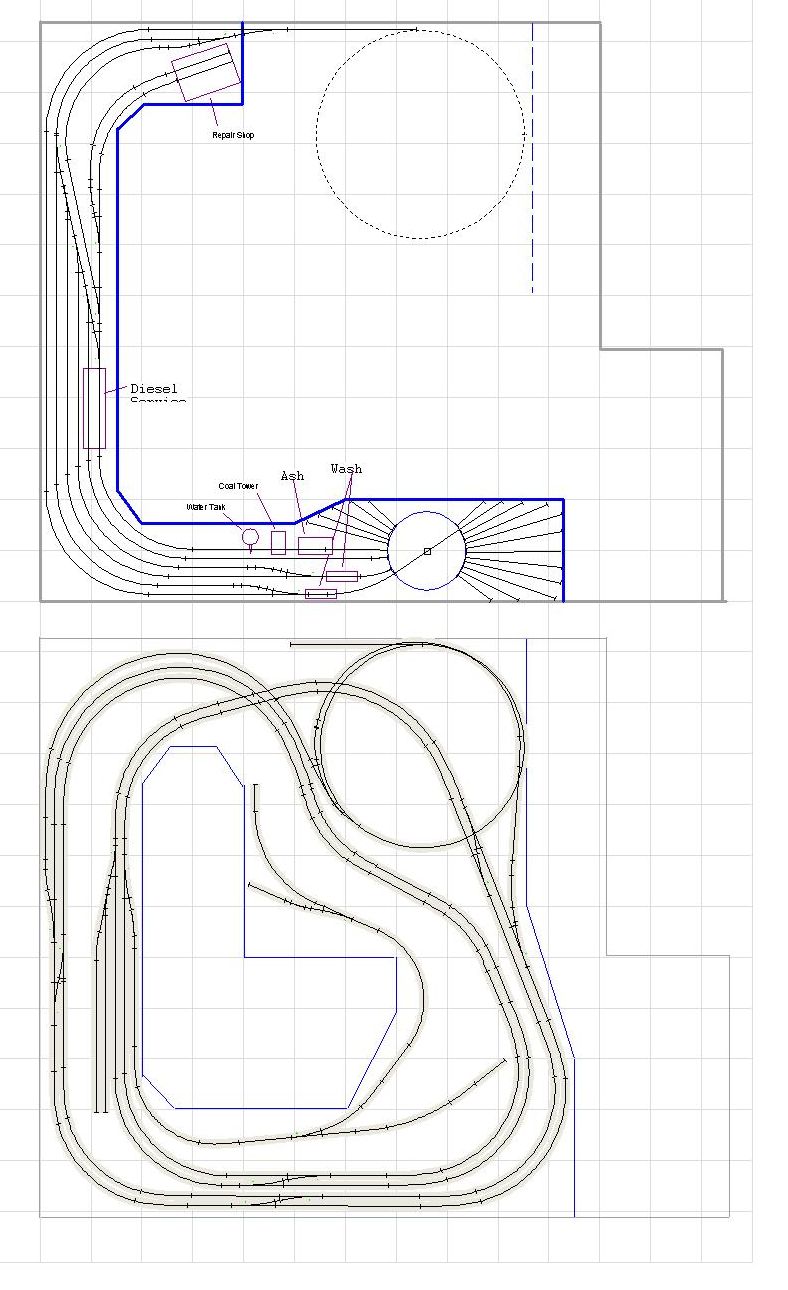
Here's the current 'final' design. The main level design is pretty much set but I'm still flexible on the layout of the upper level (other than where the two levels join). I do know that there will be a turntable on the upper level that is at least 14" in diameter.
I used Peco code 100 flex track and insulfrog turnouts and I ordered Circuitron Tortoise slow motion switch machines for turnouts that I want to automate. I have also ordered Homabed 1/4" roadbed for most of the main level track (except the helix which will use 1/8" roadbed). I'm going to use a Digitrax Super Chief for the main control system and I will use a separate Digitrax booster for the turnout switch power district.
Since I had a full four day weekend off work over Thanksgiving, it was time to start construction....
Day One --- Move two tons of stuff from spare bedroom #1 into spare bedroom #2. Do you know how much the last 6 years of Florida Sportsman, Sport fishing, Marlin, Boating, and Trailer Boats magazines weigh? Oy! Of course spare bedroom #2 was already full of stuff so there was much compactifying and moving of stuff into all sorts of crack/crevices throughout the house.
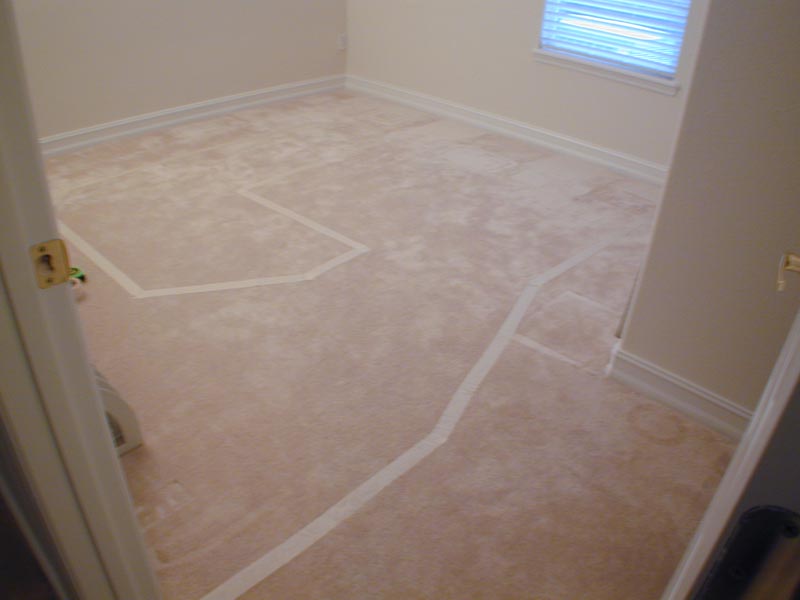
After moving 98% of the junk out of the room, here's the planned bench work edge taped onto the carpet. You can see it provides access into the closet.

Day Two --- Purchase one Yukon XL full of lumber/supplies from Home Depot and Lowes. 1x4s, 1x3s, 1x2s, 2x2s, 1/2" 5 layer sanded plywood, 3/16" door skins, 4 lbs of drywall screws in assorted sizes, etc, etc. Remove both cars from the garage and turn the garage into a woodworking shop. Start cranking out enough butt-joint sections to complete top level shelf and about 1/3 of the lower level bench work. The upper level shelf is built with 1x3s and the main level is built with 1x4s. .It was convenient that I own a 10" compound miter saw and 4 very nice right angle clamps. But it was a very long day.
Here are the 1x3 and 1x4 edges I attached to the wall with toggle bolts which would support the butt-joint sections for both levels. The main level's base elevation is 46" above the floor and the upper level is 62" above the floor.


Day Three --- Purchase 2 sheets of Homasote to be used as roadbed on the upper level. The upper level will use 1/2" plywood as sub roadbed with 1/2" Homasote on top. Build the rest of the bench work for the main level. Measure/cut the plywood sub roadbed and homasote for the top level.

Day Four --- Measure/cut the plywood sub roadbed for the lower level yard. I screwed down the upper level plywood and homasote from underneath so they can be removed (if necessary) after track/ballast has been installed on top. After installing the plywood and homasote I used 1x4s to create an edge which hides all the screws holding the 1x3 butt-joint sections together and the plywood/homasote. It looks much nicer with the clean edge. And then it was time to rest/relax.

The next step is to start on the elevated plywood sub roadbed sections of the main level. And then I wait for the homabed and track supplies to arrive The homabed is not expected to arrive until late December (D'oooh!).
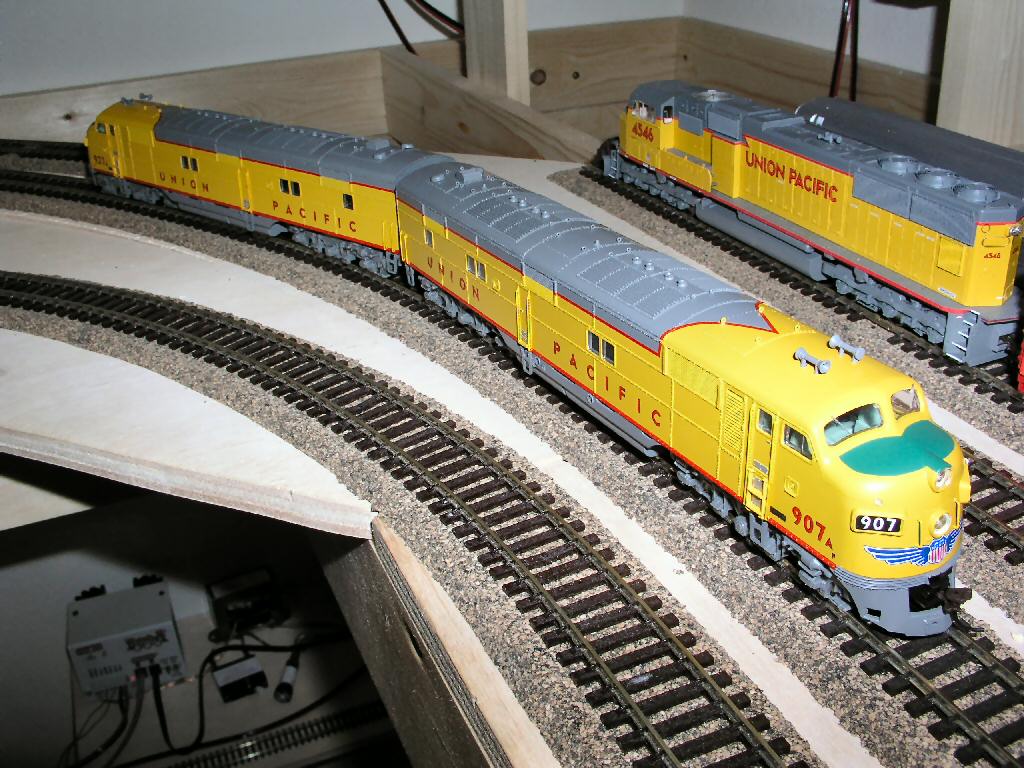
This means the only trains I'll be running for a while are the ones on the pool table. You might also be able to tell I'm going with a Union Pacific theme for my railroad.

I built the elevated sub roadbed for the double loop on the main level. I also decided to use cork roadbed rather than HomaBed because I was expecting my big track order to take 2-3 weeks before it was shipped, however I found out the track shipped early last week and it should arrive here today or tomorrow. The HomaBed was not expected to ship until the end of December or beginning of January (since I plan to have off 2 weeks at the end of December, I didn't want to be waiting for the HomaBed when I could be laying track.).


After finishing the sub roadbed, I began laying cork roadbed. I have been skipping the areas around locations where large turnouts are called for in the plans because I am not sure of the exact dimensions and geometry of the Peco large turnouts.


My Peco 'large' turnouts arrived, I finished installing the cork roadbed and then I started laying track for the double track double loop on the main level. Not surprisingly my ability to lay flex track definitely improved as I progressed and I went back and redid some "issues" with the initial track I put down. It's amazing how much you can get accomplished if you put in 14 hour days working on the railroad. After completing the double track double loop I connected a single power feed from the Digitrax controller/booster to each track of the main loop. Both tracks on the main double loop are about 65' long and I was able to run 5 locomotives at the same time with no problem. My Broadway Limited 4-6-4 is definitely better than my growing fleet of diesel locomotives at identifying areas of track work that are in need of improvement.
My friend Bob helped me install a four bulb 48" fluorescent light fixture which provides much more light than the previous halogen light I was using.
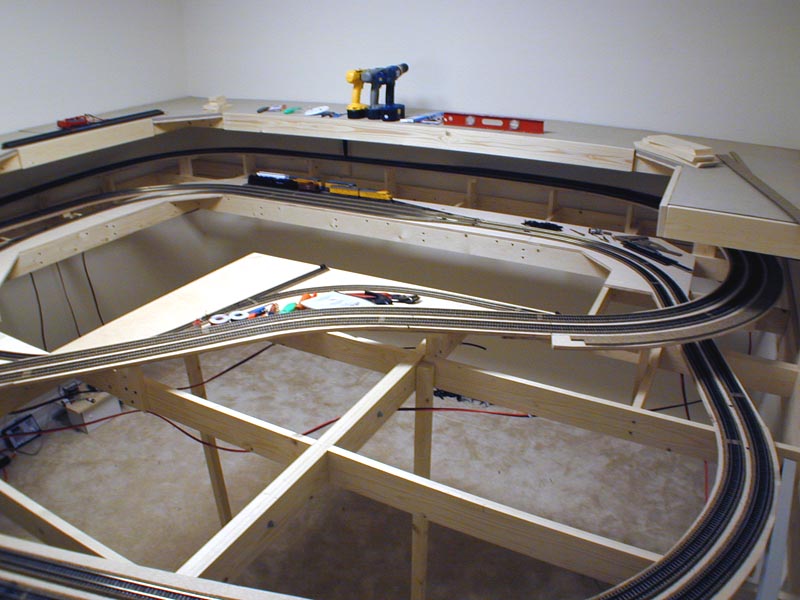
These photos provide a better view of the "operating" area in the middle of the layout.


An Athearn F3 A/B combo....

The Broadway Limited 4-6-4.

I plan to start working on the helix next week. That should be a considerable adventure in woodworking and engineering....
This week I built a small shelf that will house the power supplies and Digitrax command/control units. I also installed power bus bars for the track and turnout switch power districts. My booster for the turnout/switch power district has not arrived so I don't have any bus wires connected to the bus bar on the left. I'm waiting for the second booster and power supply before I by housings for the power supplies.

Next I began working on the helix. I first cut and sanded the first 16 (of 28) quarter rounds out of the 3/16" door skin panels (these quarter round pieces will be doubled up to produce a 3/8" subroadbed). Next I built 16 1x2 risers with 3/8" notches at the appropriate locations (3 3/4" apart). Then I started clamping some of the risers to the benchwork and placing/clamping the 3/16 quarter rounds that form the first level of the helix.


I was then able to figure out where I needed to install additional joists in the benchwork which would allow me to place additional risers where required to support the helix subroadbed. I still need to install 2 more risers, and they will provide even more of an engineering/construction challenge.


Since I figured that building a "simple" helix on my first layout would not be challenging enough ;), I will also have the opportunity to install a Shinohara #7 curved turnout in the first level of the helix to provide entry/exit in the opposite direction from the normal helix entry.

I assume that after I build each level of the helix subroadbed, I will go ahead and glue the roadbed and track for that level since there will be very little vertical clearance (~3 3/8") to work once the next level is built. It's going to be a long long week working on the helix....
I finished the first level of the helix and I have begun working on the second level. As expected getting smooth transitions in the the curved turnout on the first level was a challenge. I'm still not completely satisfied with the transitions between the code 83 turnout and the code 100 flex track.
Here are the first level and the beginnings of the second level.


I completed the helix late last night. I performed some testing today with a 6 car train of Walther's 85' Budd passenger cars and everything worked fine after a couple track laying 'tweaks'. I was even able to back the train up the helix in reverse with no problem. However I am not 100% sure if I have enough horizontal clearance in the helix for a very large articulated steam locomotive (like for instance a 'Big Boy'). Only time will tell....


Now it's time to finalize the design for the track that will occupy the top level. And I really need to decide what to do about a turntable because that will be the only way to turn a locomotive around on the top level.
I didn't get hardly anything accomplished in January because I had other prior commitments on the agenda (2 weeklong scuba trips to Belize and the Bahamas), 1 1/2 weeks worth of parental visit. February was equally unproductive because I spent a week in San Francisco at a developers conference and then I was sick as a dog for a couple weeks. I did some minor futzing during late February and got ramped back up to speed towards the end of March. In early January I had decided to go with Peco code 75 track/turnouts on the upper level, but when I finally got around to laying the track I decided that more prototypical appearance of the code 75 was not enough to overcome how much more difficult it is to deal with electrofrog turnouts (they require snipping, soldering, and REQUIRE electrical switches to route the frog/track power. The code 100 insulfrog turnouts are just too much easier (for me) to install at this point. So I finalized the upper level track layout and began laying track.
The other interesting event was that the AAA Precision 135' turntable I ordered back at the beginning of January finally arrived in March.
Here's the 'final' layout track design (The only detail I haven't resolved is how to position the ash pit transfer service track)
Here are 3 views of one 'leg' of the upper level. You can see the Diamond Scales 'Diesel Service' facility base plate in these pictures. I had to install the base plate before laying the track because the base plate extends thru the homasote and thru the plywood sub roadbed. This means that I will have to build the kit 'in place'. Hopefully that won't be too painful. Since I'm modeling the transition era (1930s to 1990s, snicker snicker) I will also have full steam loco servicing facilities on the upper level as well.


And here's the leg of the upper level that contains the 135' turntable. I ended up getting a 135' turntable because I need to turn a couple UP Big Boys (and other large steamers). There will be 2 inbound tracks, 2 outbound tracks, and 17 locomotive storage tracks off the turntable. I still need to work on the turntable mounting system to permit fine-grained level adjustment.

This is a P2K Heritage 2-8-8-2 I bought recently. You can see the (very) temporary walthers backdrop that will be replaced when the 36 foot x 3 foot backdrop I ordered from the Backdrop WareHouse arrives in a couple weeks. I spent about a month going thru hundreds of iterations of backdrop mockups before deciding on the three 12'x3' 'scenes' I ended up choosing.

My backdrop arrived earlier in the week so I had to make a decision about how to "round off" the corners of the upper level so the backdrop would have a smoother appearance. I decided to use cheap formica after I figured out that 1/8" masonite would not bend enough to fit the 28" radius corner I desired. I decided to install the formica unfinished side out because I think the backdrop will be easier to glue to the rough side rather than the glassy smooth finished side.
But first I temporarily attached one of the backdrop scenes with scotch tape to get a preview of how the backdrop will look. I will be cutting off the bottom 3" of the backdrop scene to bring the background industrial scene closer in perspective to the layout.


I used the 1/8" masonite to block out the window and to provide a backing for the backdrop across the window opening. You can also see a couple of the tracks that will service the coal mine that will reside on top of the helix mountain.

I used 1/4" masonite to provide the topographic profile on the outside edge of the layout benchwork.

I've been busy with other things (got Married, etc) so progress on the layout has been slow. I have finally received a number of locomotives that I ordered in the spring (4 Broadway Limited 2-6-6-4 Class A unlettered, 2 Broadway Limited E6As, 4 P2K GP60s, and 2 Athearn RTR AC4400).
Here's a couple pictures I took of the E6s

Working on the canyon wall. I cut some ceiling tiles into 1 1/4" strips and then notched them on the back so I could bend them to form the canyon/mountain side.

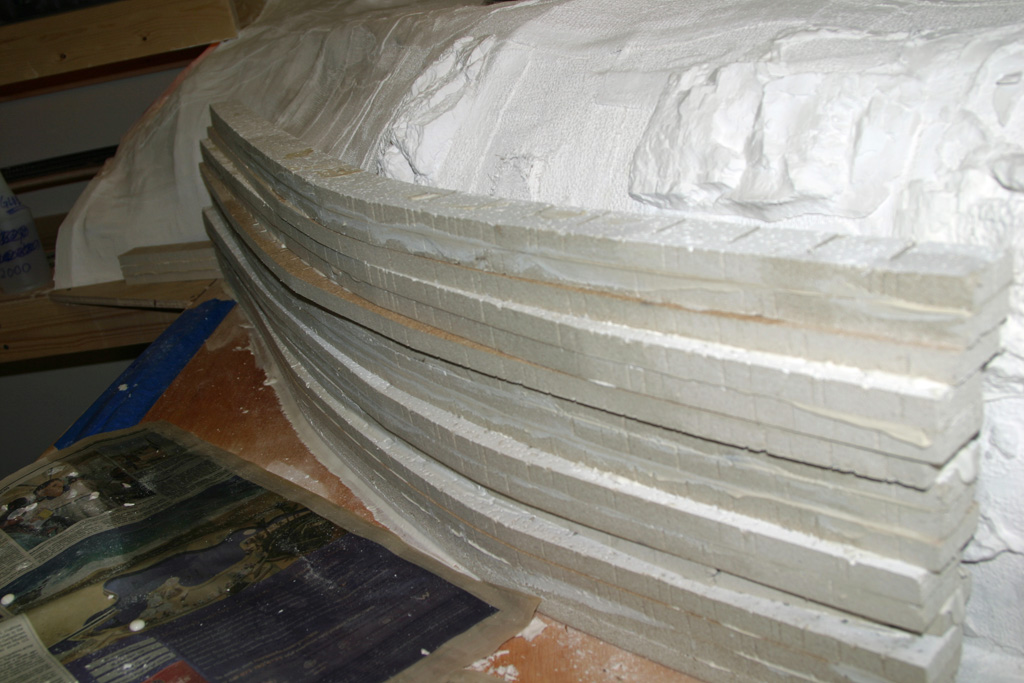


After forming the wall with the cut ceiling tile strings, I applied sculpta-mold to the surface.


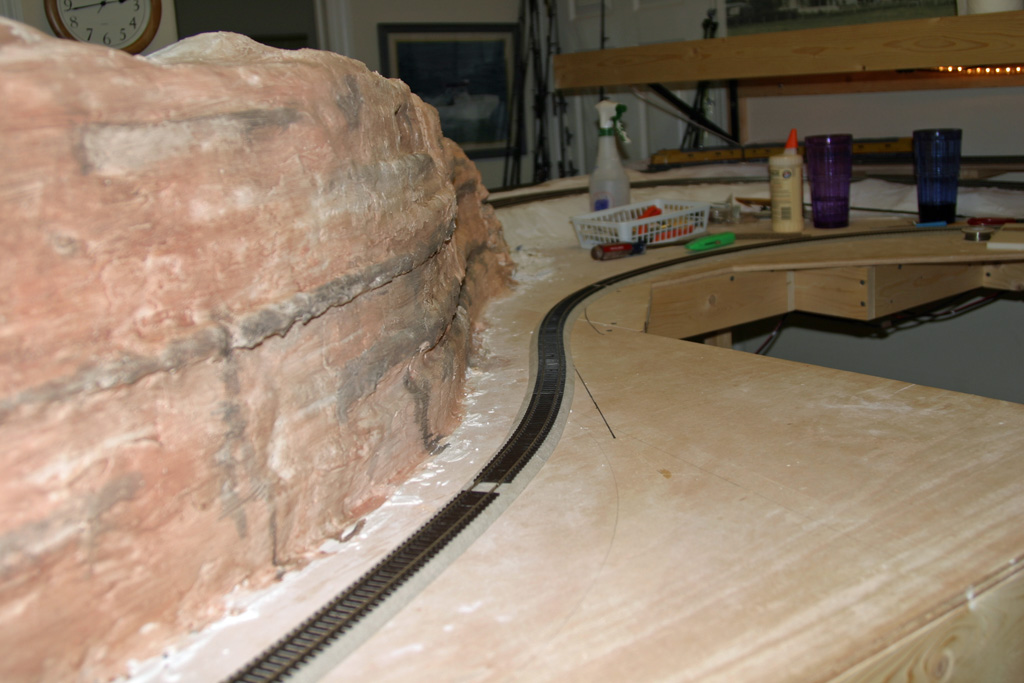
Trying to add some color. I will be the first to admit that I am a failure at Scenery 101. I also redid the track here to remove the turnout.


December 2011 -- I'm beginning to work on designs for the new layout that will be built in the 'workshop' of the detached garage we are planning to build. I will have a 24'x32' space to work with. Both of my two current working designs are single track mainlines with return loops at either end.
Following the John Armstrong "Givens and Druthers" technique, here are mine for the new layout:
Givens
I like watching trains run
Not currently into operations. Not sure if I will ever get
into operations
This first basic design is a 'mushroom' design with three levels. The main level is at 42" elevation. The middle level is at 62" elevation. The top level is at 75"-82" elevation. The mainline run from the lower return loop (Pocatello) to the upper return loop (Butte) is 430 feet.


This design utilizes a 'nolix' to move trains from the main level to the upper level. It also has a lower 'staging' level accessed via a double track helix below the 'nolix'. The main level is at 46" elevation. The top level is at 64" elevation and the staging level is 28" elevation. This design has a 290 foot mainline run between the main level return loop and the upper level return loop. If you were to include the run through the intersected railroad that runs down through the staging level, then the continuous run from the main level return loop to the upper level return loop is 660 feet.


Update on the current layout.... Most of the landscape has been formed. The current scenery is mostly done as 'snow' white. As in raw plaster. :)


A couple years ago I built a half dozen small DPM structures for the layout, but I recently started working on Downtown Deco's "Adam's Ave #5" cast hydrocal kit. It's my first hydrocal kit. I need to finish the roof details and do some minor touchups, but here it is:

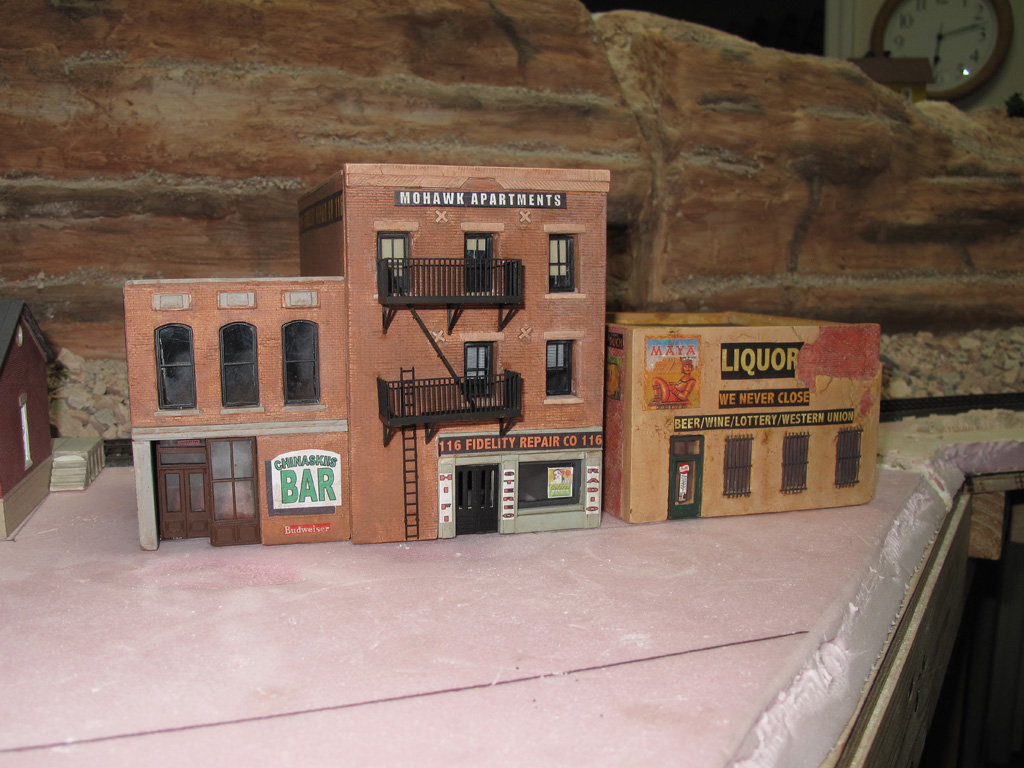
It's a good thing that I really enjoyed building this kit, because I have a bunch of Downtown Deco kits to build. Yikes! My wife would prefer for us to build "Martha Stewartville", but I prefer the gritty grimier side of life. There are no pressure washers on my side of the tracks. :)
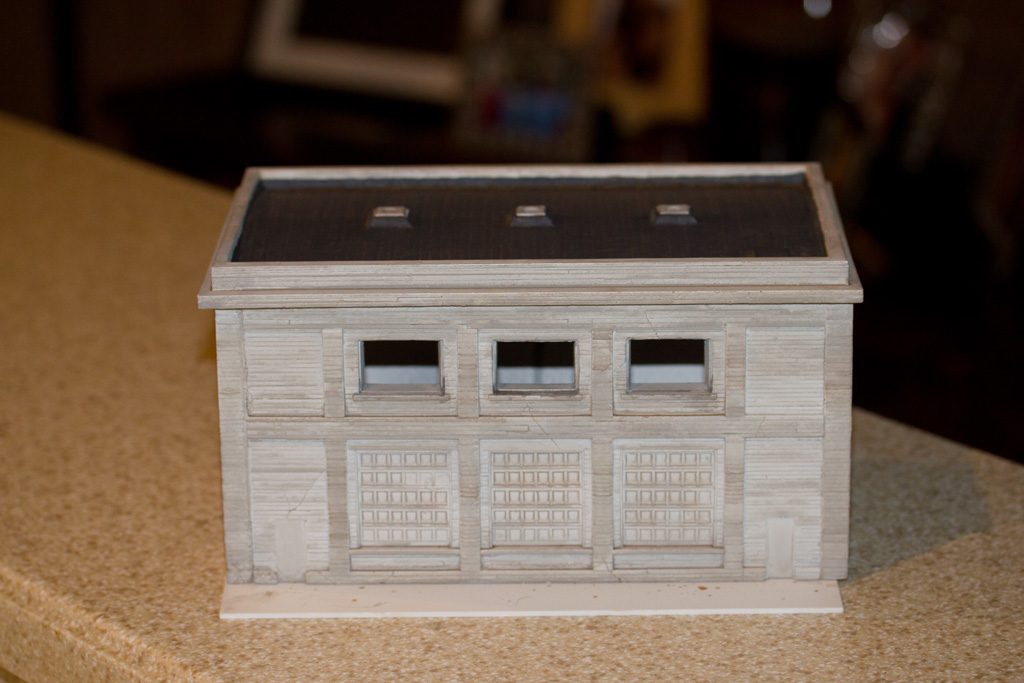
While finishing up the Adam's Ave Part V kit I started working on the Thomas A York "Duquesne Manufacturing" kit. It's a fairly large concrete warehouse style building with a very cool small powerhouse building.
In these pictures I have primed, done a concrete stain, and a burnt umber wash on the main building. I found that I had trouble gauging the primer coverage (not enough) with Adam's Ave using just white primer (on white plaster), so with this kit I am priming first with a light gray coat and then a white coat. I will primer the smaller powerhouse building and then start painting it.


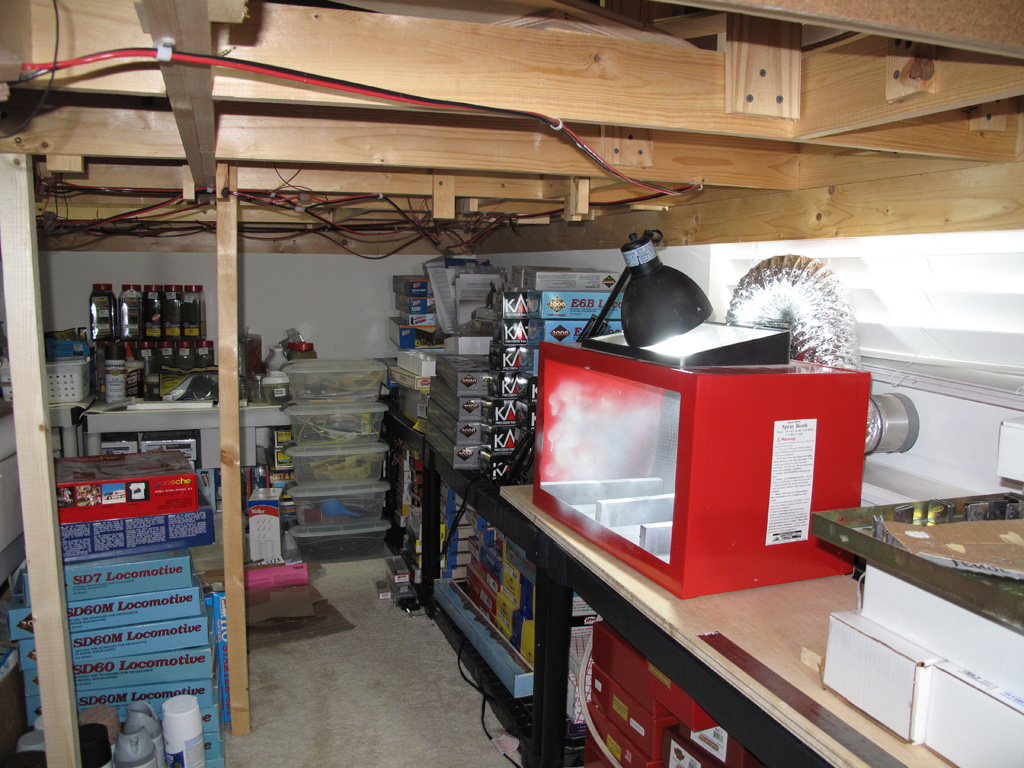
Here's a couple photos of my spray booth that I use when spray painting models. It's vented to the outside and although it's not the most convenient location (under the layout, have to sit on the floor while using it), I don't really have any better locations and it works fine.

Getting closer to finishing these two kits:


I built another small Downtown Deco kit over the last couple of days. The kit is "Randy's Hamburgers", but I built it as "Whitey's Hamburgers" in honor of my friend Steve (aka "Whitey"). I created the Sunkist Cherry Limeade billboard to memorialize the time when Whitey spilled a cup of Cherry Limeade in the back seat of my car (and then spent the next couple of months trying to get the stains out of the carpet). "Carl", also a friend from work, has subsequently tagged the wall of Whitey's burger shop.


I've started working on my next kit. Downtown Deco "World Travel". In these photos I have cleaned up the wall castings, sanded them to get a good tight fit, and test fitted the window frames (this always seems to require some plaster scraping). I glue the walls together using five minute cure 2 part epoxy. I have also spray painted the window and door frames.


Yesterday I built the white shelf to hold the taller acrylic paint bottles I use when painting structure kits.


I have finished the basic painting of the structure. Next I will 'mortar' the brick walls and then apply some weathering washes.


After I applied the 'Roberts Mortar Mix' to the back wall and I'm waiting for it to dry enough to wipe off the excess.

After wiping off the excess mortar mix. Next I will apply some weathering washes that will really tone down the 'new' looking mortar.


Here's 'World Travel' after some weather, window details, decals, and billboards have been applied:

Here's the next Downtown Deco kit I have started "Skid Row Part 2":


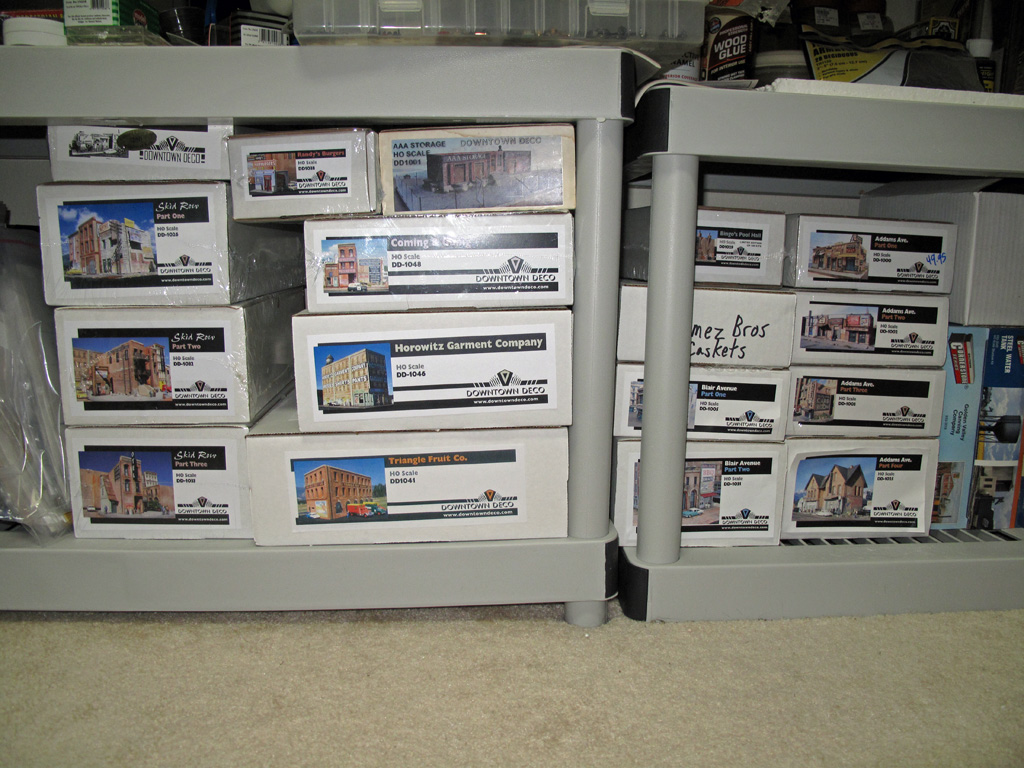
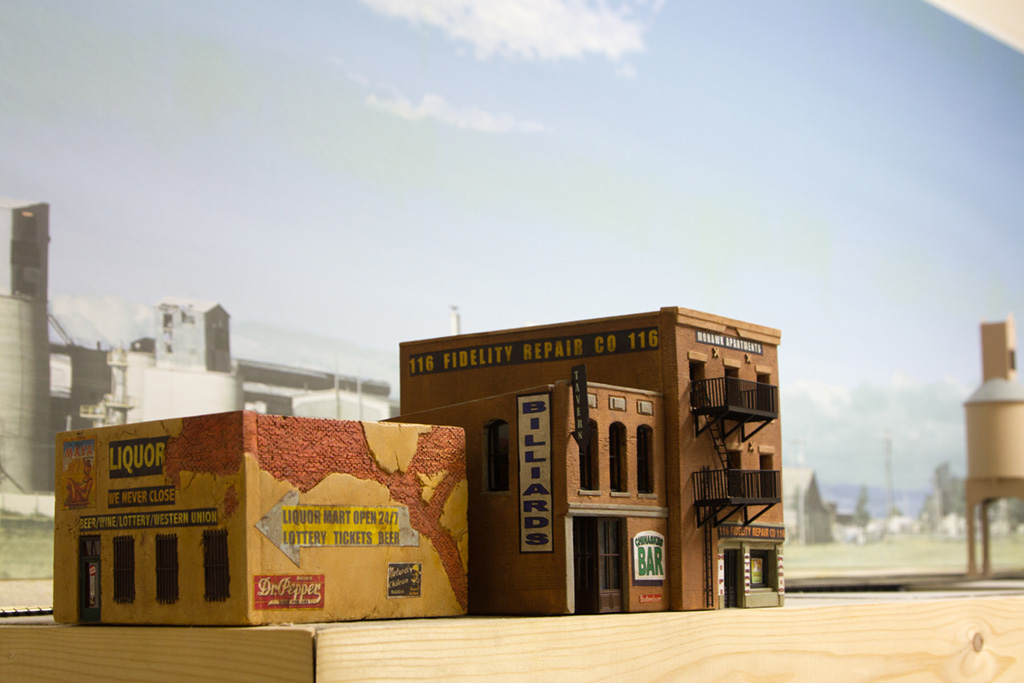
All my current Downtown Deco kits ("Skid Row Part 2" is still under construction):

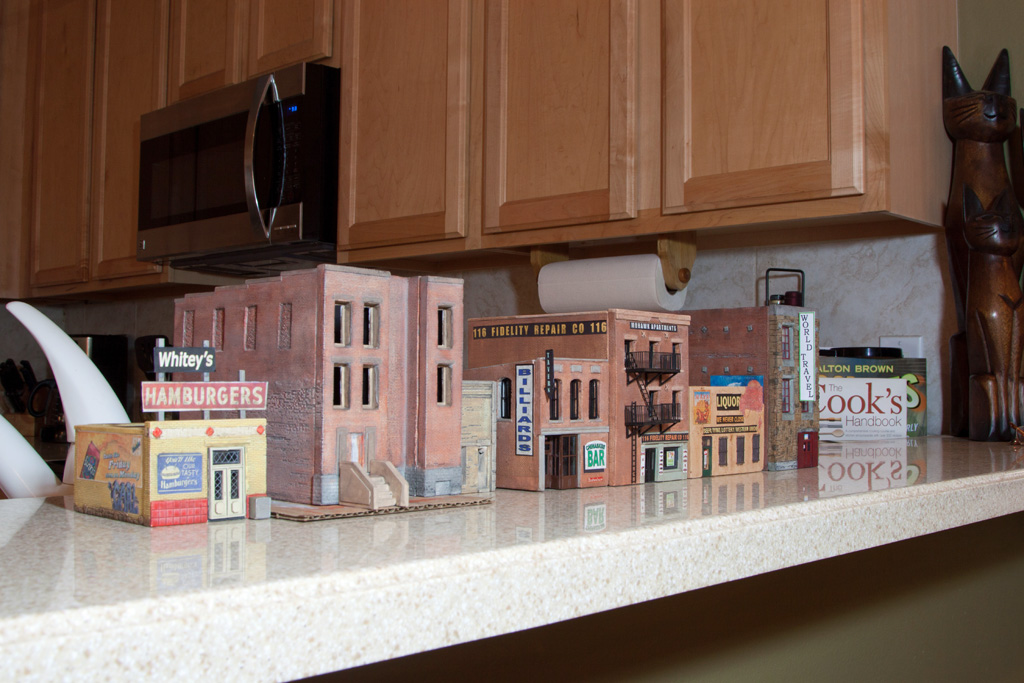
And I've chosen the next kit I am going to start working on. Downtown Deco "Skid Row Part 1".

I've built the smaller 'Liquor Store' building in Downtown Deco "Skid Row Part 2" into the "Kwik E Mart". That guy in the window seems familiar....


More Downtown Deco kits arrived today. I need to get busy!

I'm continuing to work on the 'Aztec Apts' building.
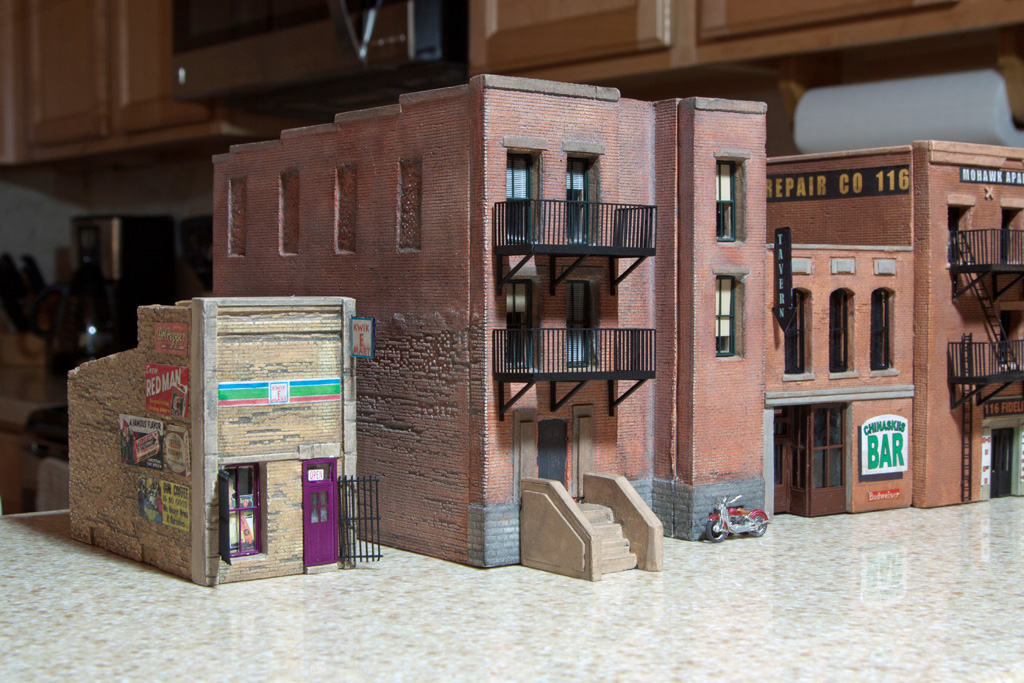
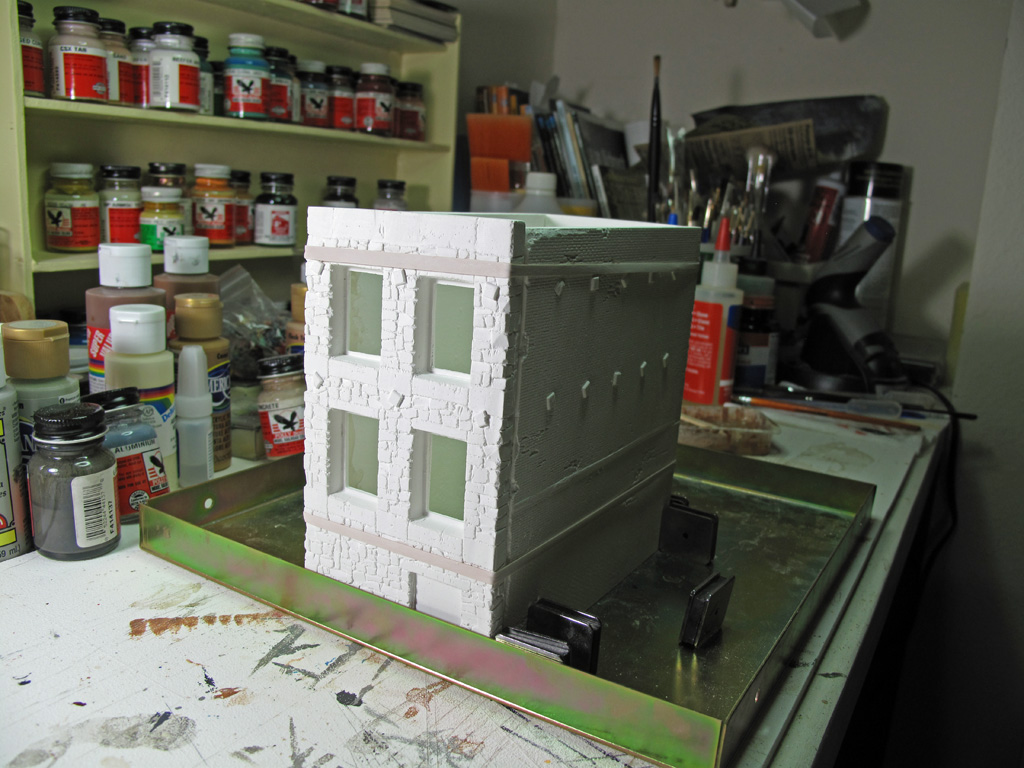
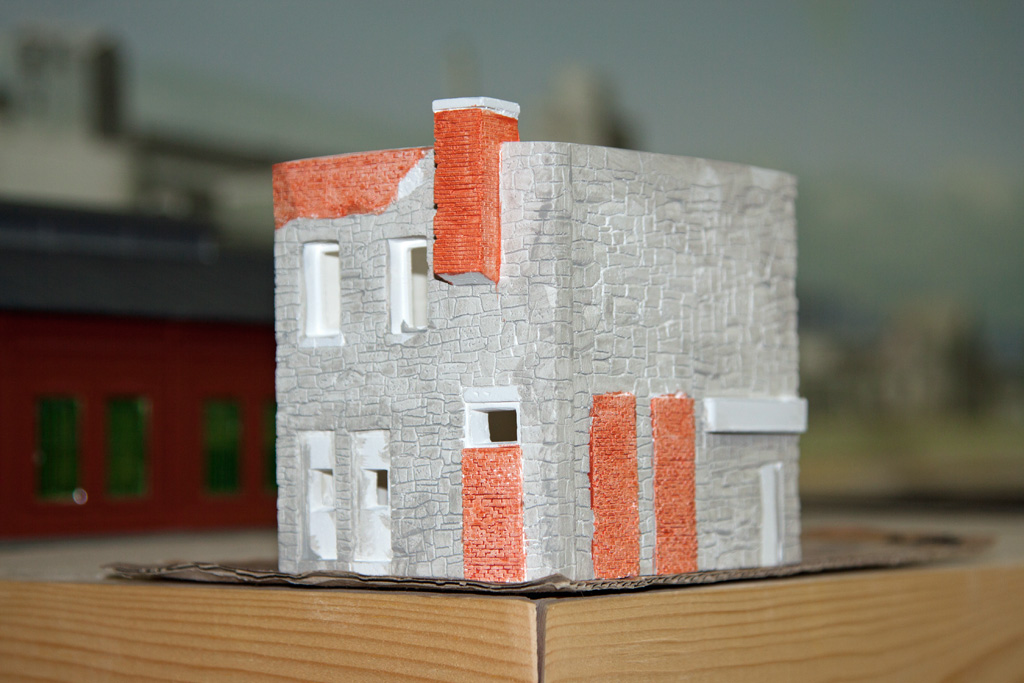
Starting to work on "Skid Row Part 1". Of all the Downtown Deco kits I've built so far, the wall castings for the larger building have required the most work to get reasonably true fits. As can be seen in this photo.

I sanded, shaped, sanded, checked, sanded, rechecked and eventually got all the walls to fit reasonably.


After gluing the walls together I sprayed a light coat of primer and then started painting the base wall colors.
The smaller building colors are: stone areas - Apple Barrel 'Country Gray', brick areas - Apple Barrel 'Sweet Potato', trim areas - Folk Art 'Linen'
After the first coat:
After a second coat and trim painted:

The larger building's colors are: Left building brick areas - Folk Art 'Terra Cotta', Right building brick areas - Apple Barrel 'Toffee'.


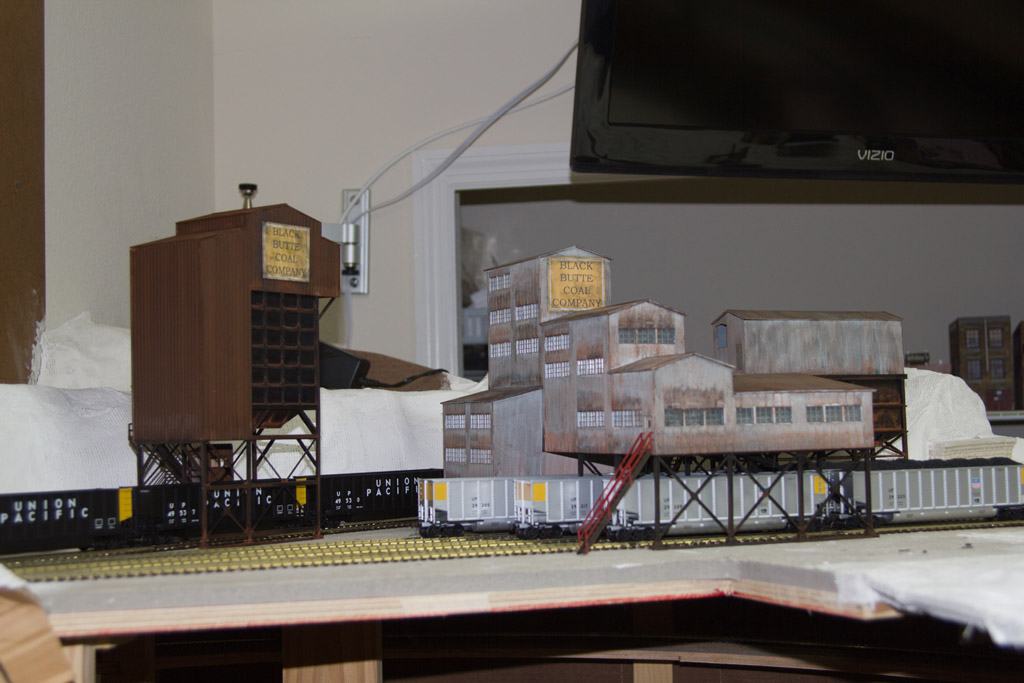
I decided to build some Walthers plastic models I need for a large coal mine scene on top of the helix/mountain on my current layout. Here is the 'New River Mining' kit built as "Black Butte Coal Company" as well as the "Coal Flood Loader" kit. I installed LEDs in the New River Mining kit to night time effects. Next I will build the Walther's Glacier Gravel as a coal mine operation that feeds both of these models.


Here's my current loco roster. All of these locos have DCC decoders installed (One advantage of starting from scratch). As you can see I own locos that cover a wide range of 'eras'. I like big steam engines. I like the 'F' series diesels. I like the just about all the locomotives produced since the early Thirties. My name is FishDug. I have a problem. I need to stop buying locomotives. :) And please don't feel compelled to tell me that the Union Pacific didn't run 4-6-4 Hudsons. As previously mentioned regarding designing the new layout, my plan is to model a freelance railroad company that shared track rights with the Union Pacific between Pocatello and Butte. This other railroad line, the "Armadillo & Butte" will run 4-6-4, 2-6-6-4, and 2-8-8-2 steam locomotives.
Diesel Locomotives
Atlas
Dash 8-40B #5673
Dash 8-40B #5698
Dash 8-40B #None
SDP-35 #1407
Athearn Genesis
F3 A/B #1402/#1402C
F3 A/B #21A/#21B ATSF
EMD SD70M #4357
EMD SD70M #4546
EMD SD70M #4674
EMD SD70M #4527
Broadway Limited
EMD E7A #907a
EMD E7A #927a
Kato
SD-90MAC #8059
SD-90MAC #8104
GP-35 #792
GP-35 #794
SD40-2 #3220
SD45 #3633
SD45 #3605
NW-2 #1036
NW-2 #1047
NW-2 #1003
Proto 2000
SD-7 #450
Alco FA1/FB1 #1624
EMD E6 A/B #987A Dummy #987B
EMD E6 A/B #994A Dummy #987C
EMD E6 A/B #997A Dummy #985B
EMD SD60M #6288
EMD SD60M #6293
EMD SD60M #6088
EMD SD60 #6005
EMD GP60 #5835
EMD GP60 #5876
EMD GP60 #1983
EMD GP60 #2081
Stewart
Alco C630 #none
VO-1000 #1200
Steam Locomotives
Broadway Limited
Hudson 4-6-4 #1243
Hudson 4-6-4 #none
2-6-6-4 Class A unlettered
2-6-6-4 Class A unlettered
IHC
Streamlined Pacific 4-6-2 #2906
P2K Heritage
2-8-8-2 Mallet #3673
2-8-8-2 Mallet #3671
2-8-8-2 Mallet unlettered
2-8-8-2 Mallet unlettered
2-8-8-2 Mallet unlettered
Trix
4-8-8-4 Big Boy #4013
4-8-8-4 Big Boy #4013
Lionel
4-6-6-4 Challenger #3710
4-6-6-4 Challenger #3980
Rivarossi
4-8-8-4 Big Boy #4011
Mantua Classic
4-6-2 Gray Goose